- 日本語 <Japanese>
- 英語 <English>
FILCO ASSIST 操作マニュアル
FILCO® キーボードをご購入いただき、誠にありがとうございます。
FILCOキーボードは直感的かつ、効率的に使用できることを理想とし設計されています。
FILCO Majestouch Xacro[ザクロ] シリーズは、ハードウェアマクロ機能を用いたキーコード変更や、キー入力パターンのプログラミングが可能なだけではなく、Xacro専用ソフトウェア「FILCO Assist[アシスト]」を使用して、ソフトウェアプログラミングをすることも可能です。
「FILCO Assist」のホーム画面では、キーボードのディップスイッチの状態や、キーの設定状態を一目で確認可能です。また、マクロ登録やテキスト登録もモニターで確認しながら作成し、ドラッグ&ドロップするだけで、簡単にオリジナルのキーボードプロファイルを作成することが可能な、とても使い勝手のよいソフトウェアです。
FILCO Majestouch Xacroシリーズと「FILCO Assist」を組み合わせて、より良いPCライフをお楽しみください。
目次
1.準備
1-1.ソフトウェアのインストール
ソフトウェア使用許諾条件をよくお読みになり、同意いただいた場合のみソフトウェアをインストールしてください。
1-2.ハードウェア(キーボード)を設定する
裏面のDIPスイッチ(11)をONにし、プログラミング機能を有効にします。
1-3.ソフトウェアを設定する
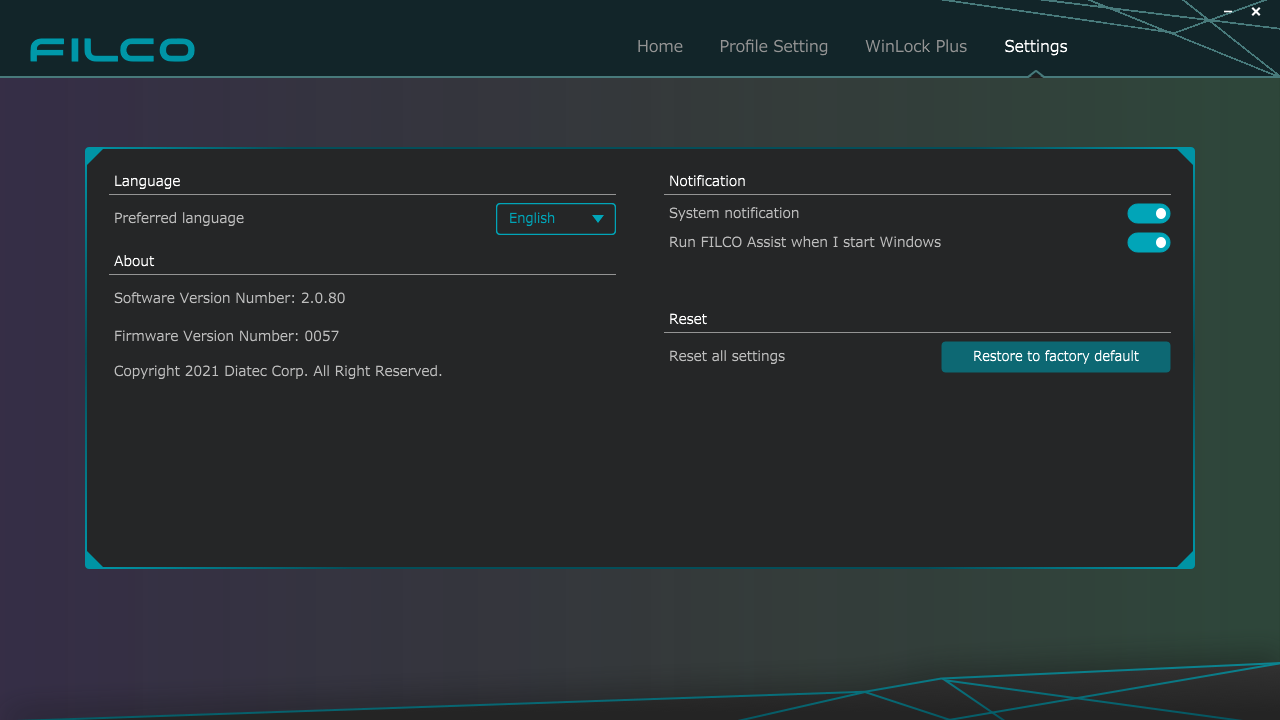
FILCO Assistを起動し、右端の「設定」タブを開きます。
・言語の選択(日本語・英語)
・ソフトウェアのバージョン情報
・キーボードファームウェアのバージョン情報
・通知設定(ON/OFF)
・ソフトウェアの自動起動(ON/OFF)
・キーボードの初期化(ソフトウェアから実行)
※キーボードの初期化には約30秒くらいかかります。
※キーボードの初期化後はUSBケーブルを接続し直してご使用ください。(USBを抜き挿ししてください)

1-4.ソフトウェアを使用する
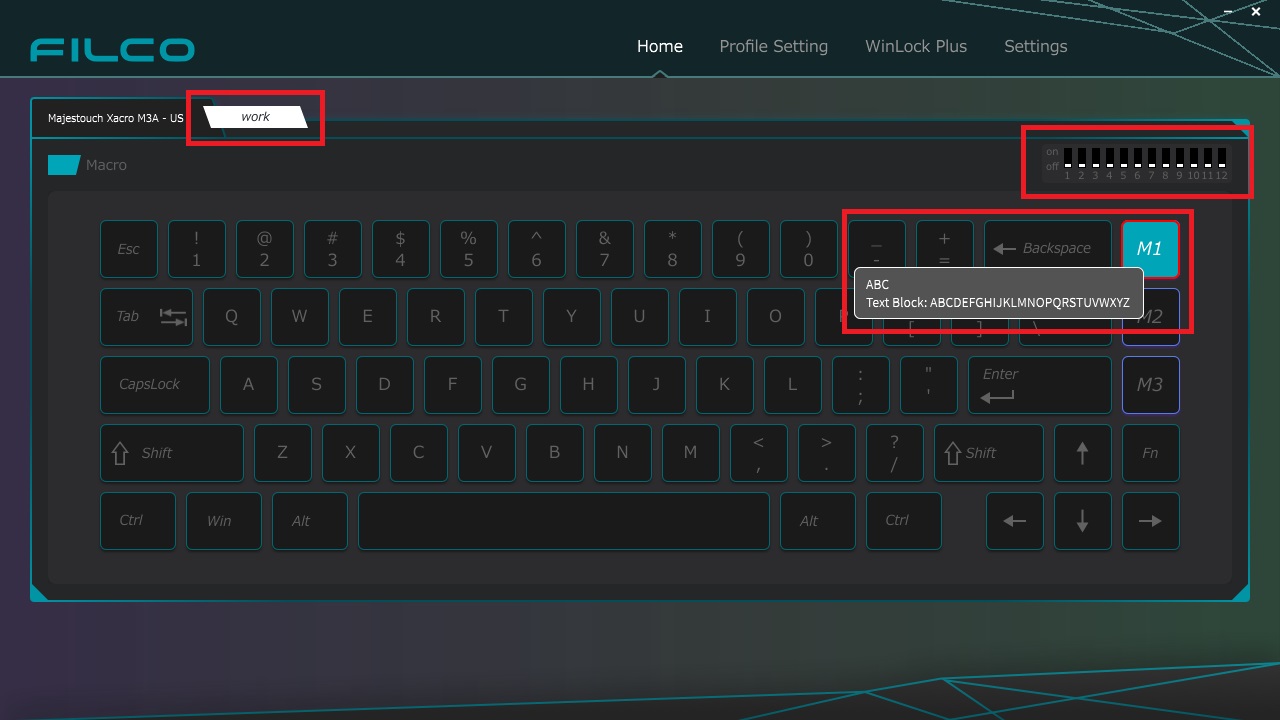
「ホーム」タブではキーボードの状態を確認できます。
・接続キーボードのDIPスイッチの状態の確認
・レイヤー毎のキー設定の確認

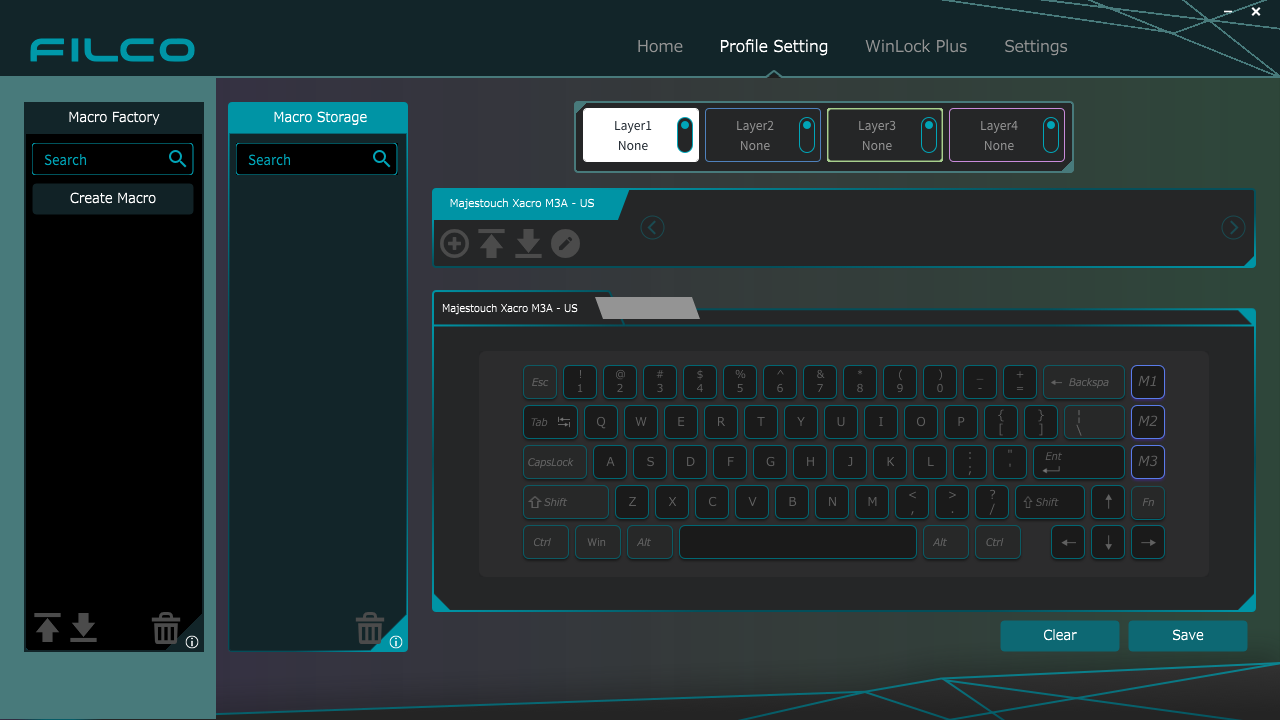
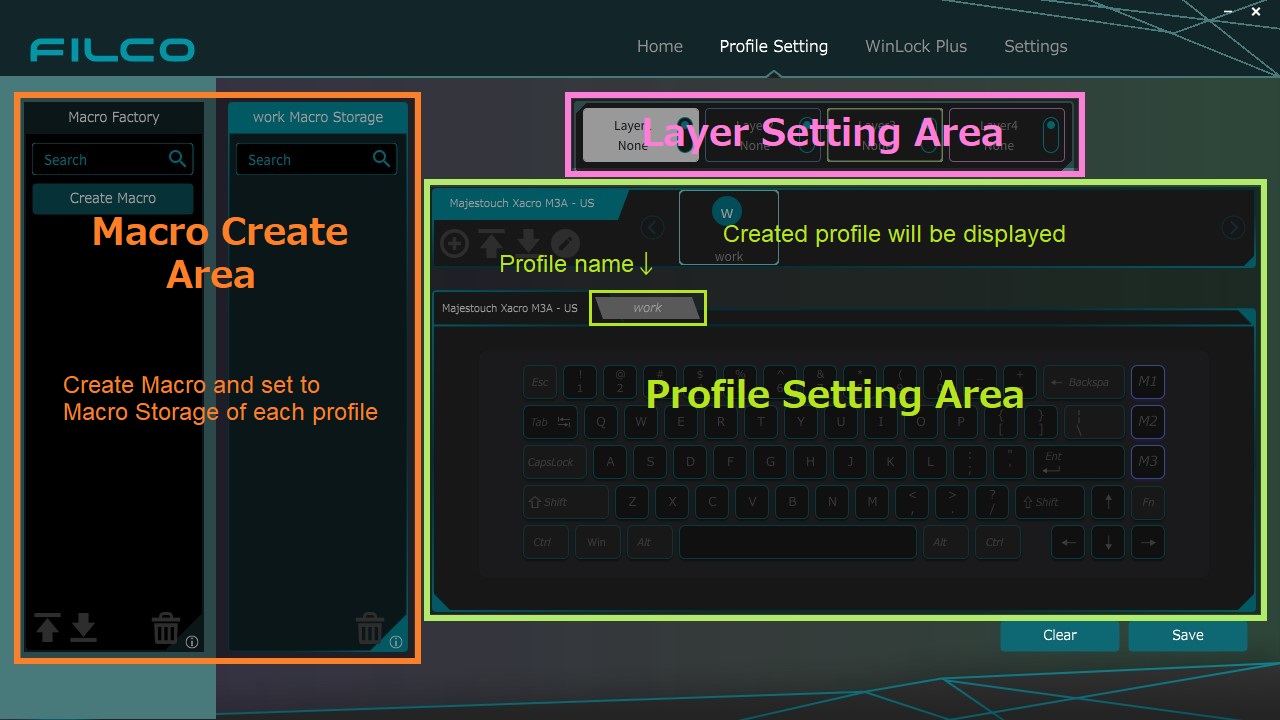
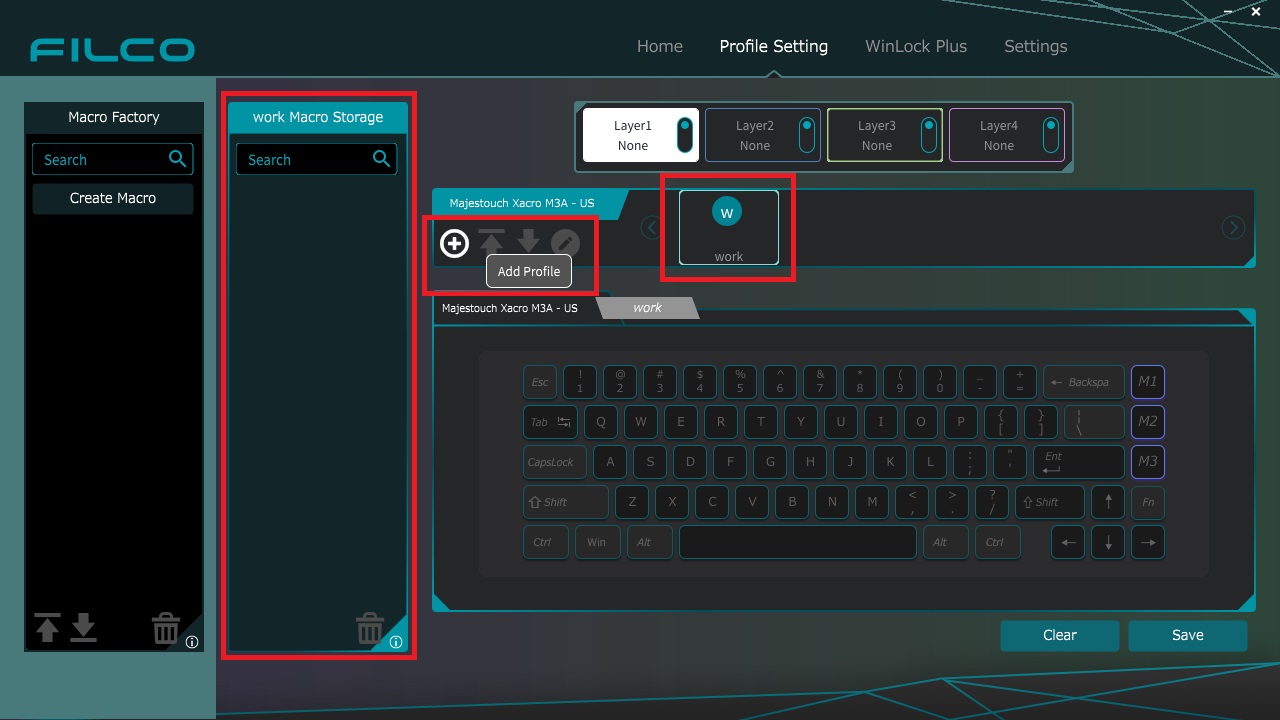
「プロファイル設定」タブではマクロの作成やプロファイルの作成、プロファイルにマクロを設定できます。
マクロ作成エリア:
マクロファクトリーでマクロを作成し、各プロファイルのマクロ倉庫に保存していきます。
レイヤー設定エリア:
ここでは「レイヤーの変更(指定して右クリック)」、「レイヤーにプロファイルを設定(ドロップ)」、「レイヤーへの上書きロックの設定/解除」が設定できます。
プロファイル設定エリア:
プロファイルの一覧が表示されています。この中から選択したプロファイルの状態がキーボード図上に表示されます。
2.プロファイルを作成し、マクロを登録する
2-1.プロファイルの作成
当ソフトウェアはコマンドを作成し、それを各キーに割り当てたプロファイルを作成する為のソフトウェアです。そのプロファイルをキーボードに設定することで、オリジナルキーボードにすることができます。
プロファイルを作らないと、マクロやテキストを割り当てたり、キーロックを設定したりすることもできません。
1.プロファイルを作成し名前を付けて保存します。
ボタンをクリックすると、プロファイルが生成されます。
名前を付けて「OK」ボタンを押すとプロファイル倉庫に保存されます。
プロファイルは8個まで作成が可能です。

2-3.マクロエディターのタブ機能
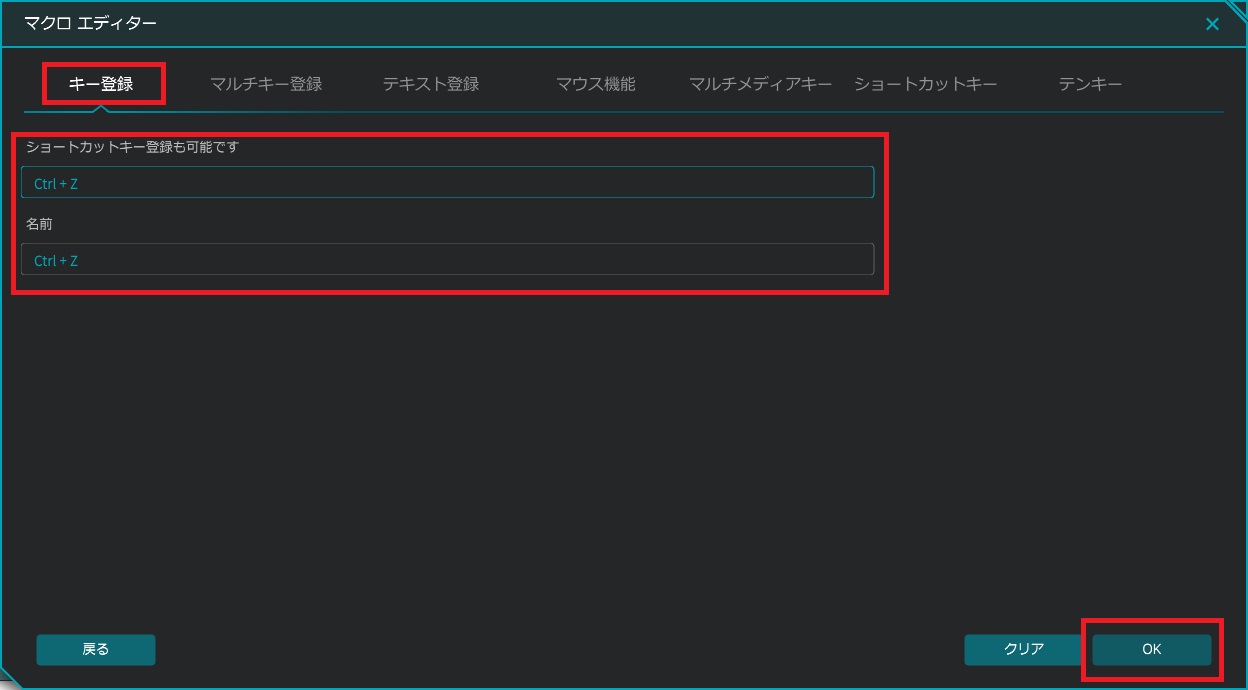
・キー登録
キーストローク、ショートカットキー登録が可能です。
キーストロークの登録方法:
[クリックして入力]の枠内に任意のキーを入力し、OKボタンをクリックし保存する。
ショートカットキーの登録方法:
「Ctrl+Z」を登録する場合、「Ctrl」→「Z」の順番に押し合わせすると、枠内に「Ctrl+Z」と表示されます。
OKボタンをクリックし保存します。
※Ctrlキーだけ押しても反応しません。「ALT+●」や「Shift+●」も同様の方法で登録可能です。
注1:キー登録ではWindowsキーのショートカットキー設定ができません。
Windowsキーのショートカットキー登録は、マルチキー登録のプロフェッショナルモードで作成していただくか、Windowsキーのショートカットキー一覧よりダウンロードしてご使用ください。
ダウンロードしたマクロの登録設定方法はこちら↓
Windowsキーのショートカットキー一覧はこちら↓
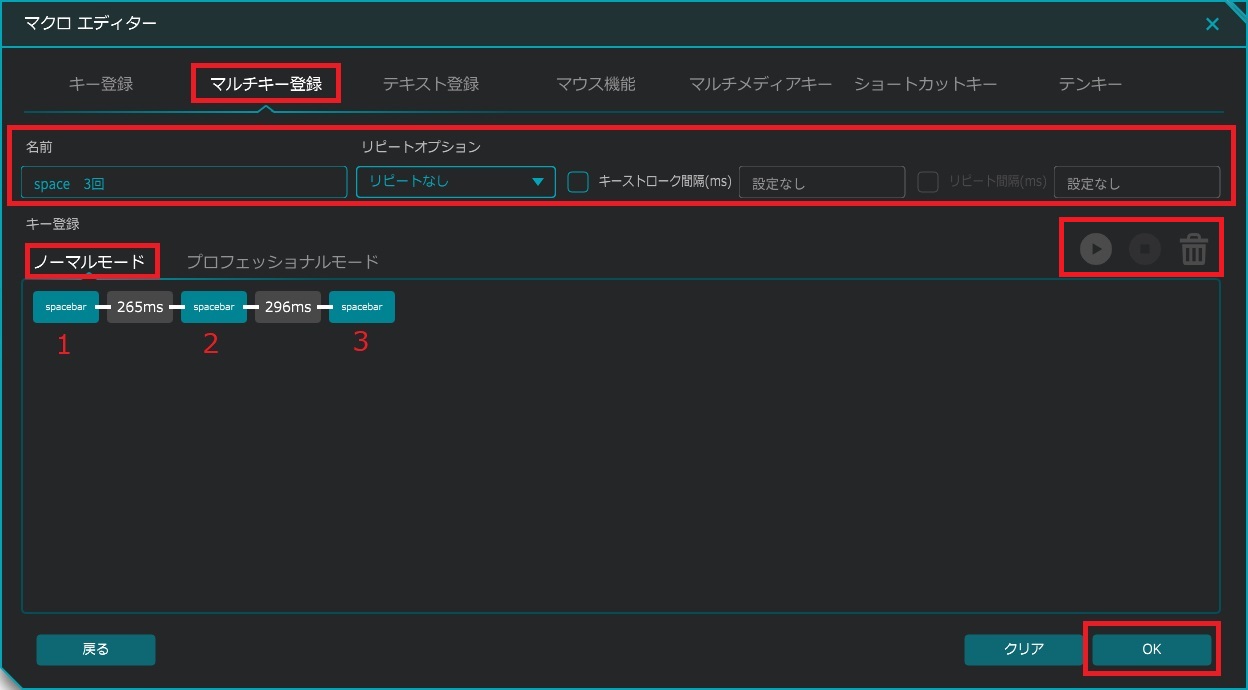
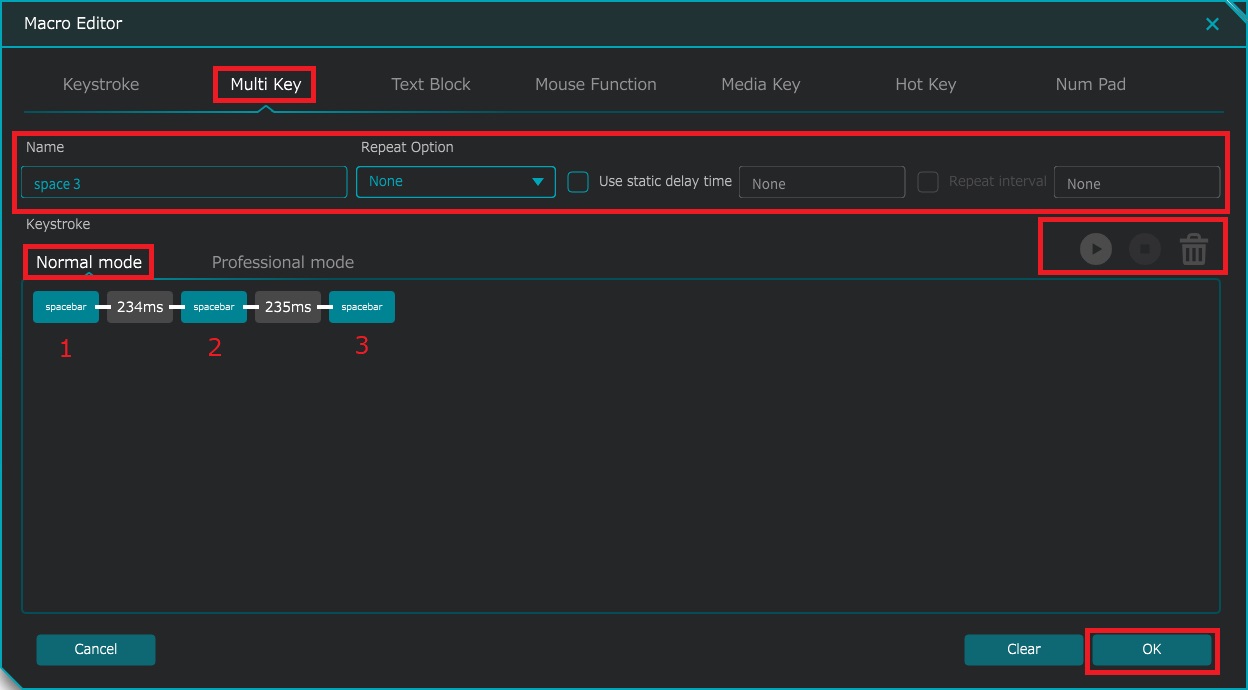
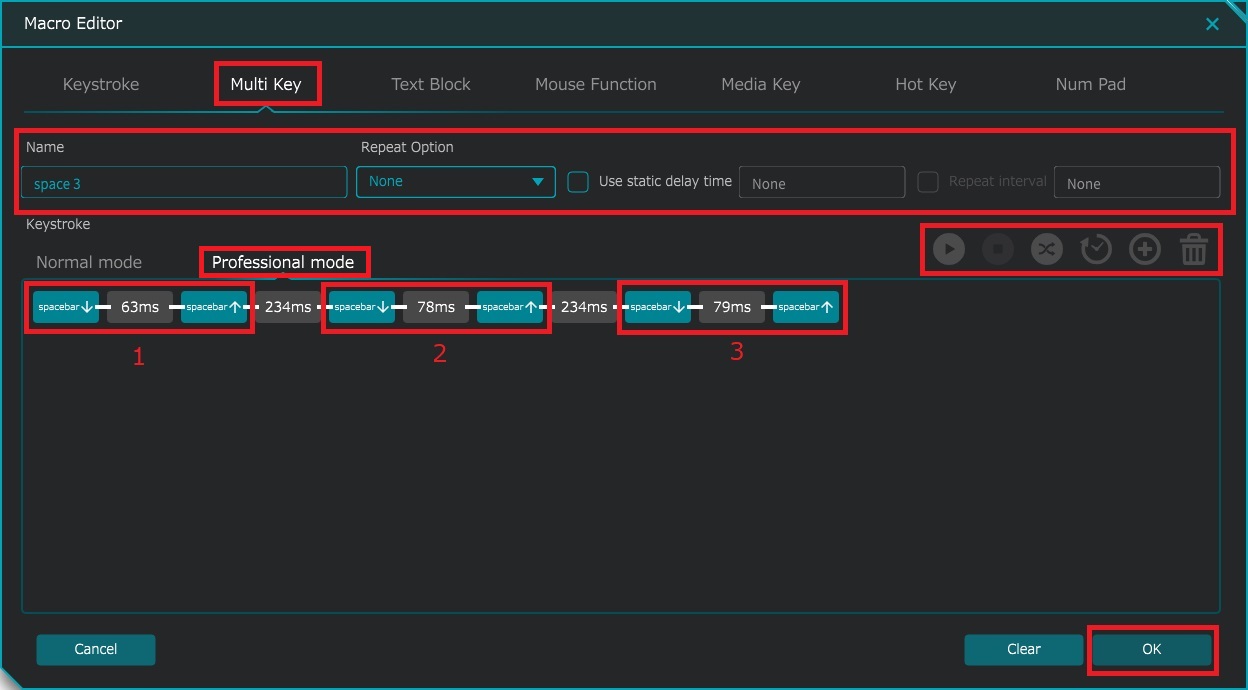
・マルチキー登録
複数のキー登録を組み合わせて、一連の入力を1キーストロークで実行することが可能になります。
マルチキーはキーを入力した順番や、入力速度を記録または指定して、その順番通りに出力するといった設定が可能です。
キーストロークとは違い修飾子キー以外の文字キーも複数組み合わせすることが可能です。
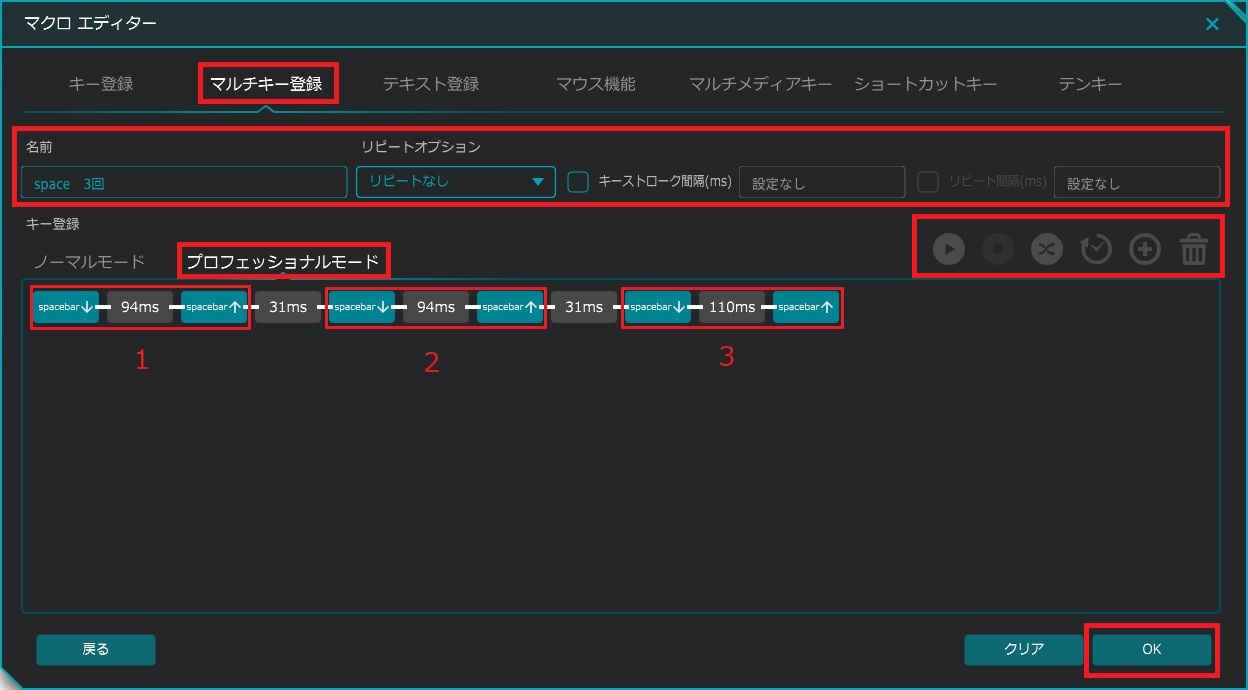
また、プロフェッショナルモードではキーストロークのキー変更やその間隔を詳細に設定することが可能です。
※32キーストロークまで登録可能(ハードウェアマクロと同等)
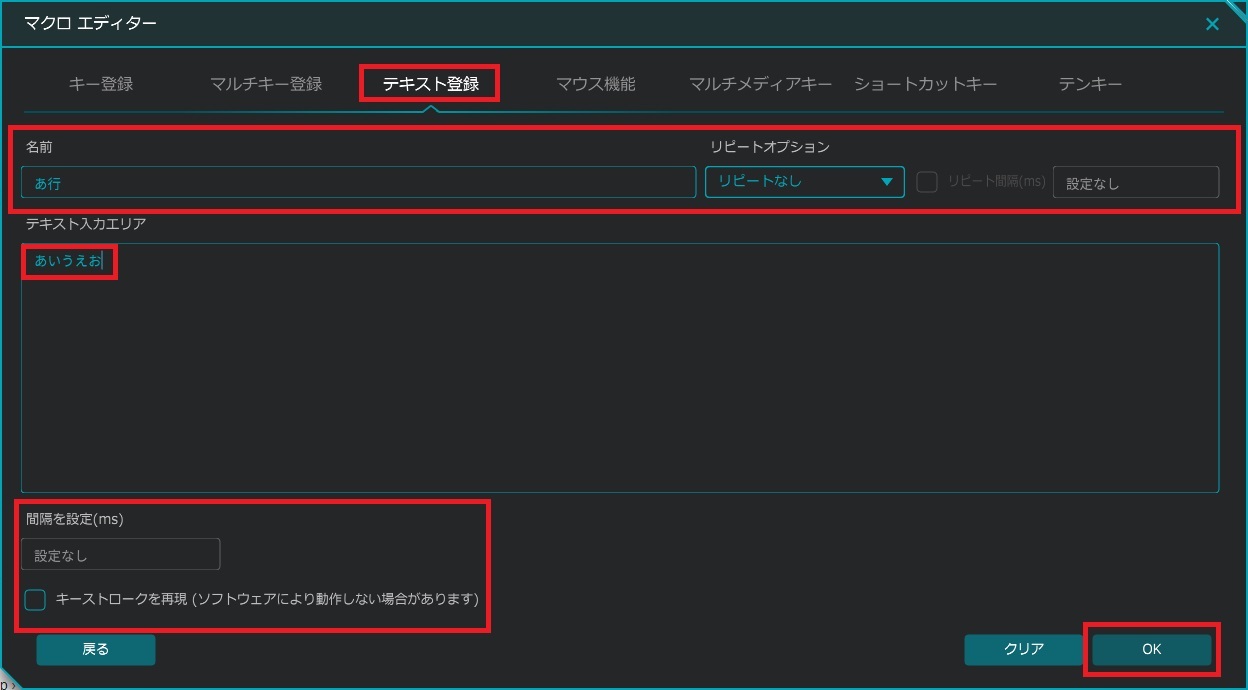
・テキスト登録(ソフトウェアテキスト登録機能)
FILCO Assistではテキストを登録が可能です。
コピー&ペーストにも対応しており、リピートオプションやキーストローク間隔の指定もできるので、簡単にテロップ作成をすることが可能です。
(※使用するソフトウェアによってはリピートオプションやキーストローク設定ができない場合があります。)
注意:「テキスト登録」マクロはFILCO Assistにデータを保存しているため、そのマクロを設定したPCでのみ機能します。
その際FILCO Assistがバックグラウンドで立ち上がっている必要があり、立ち上がっていない場合には機能しません。
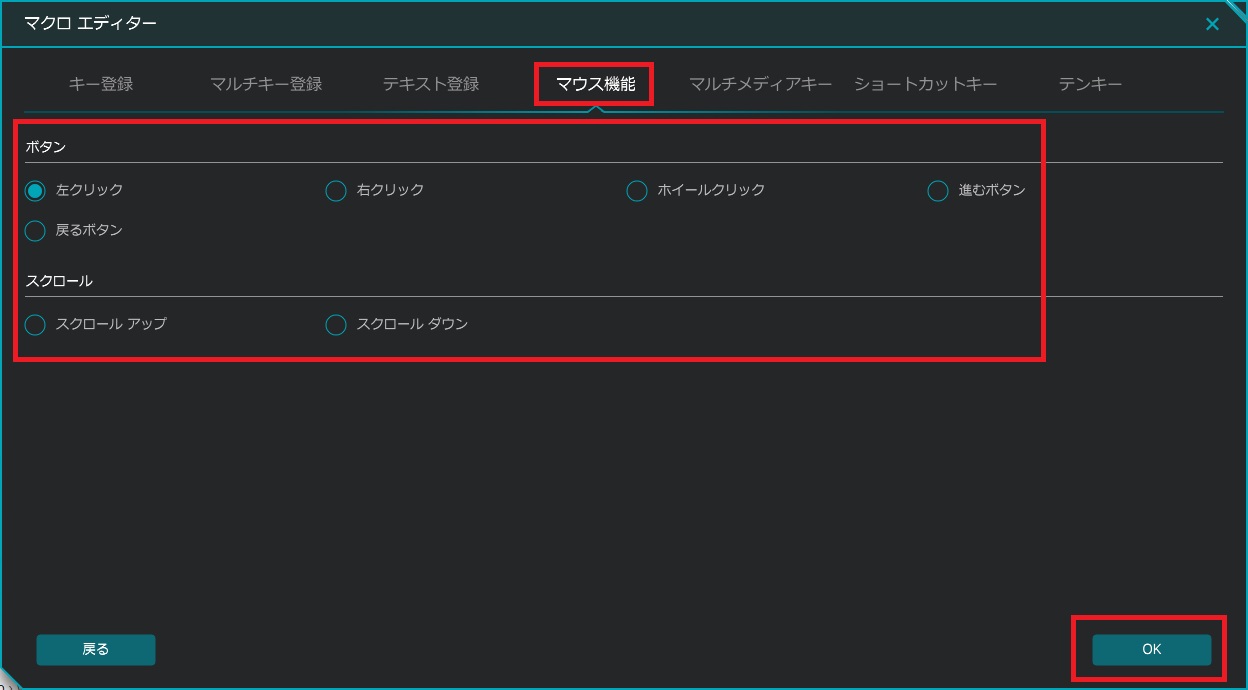
・マウス動作登録
マウスの動きをワンクリックでマクロ設定することが可能です。
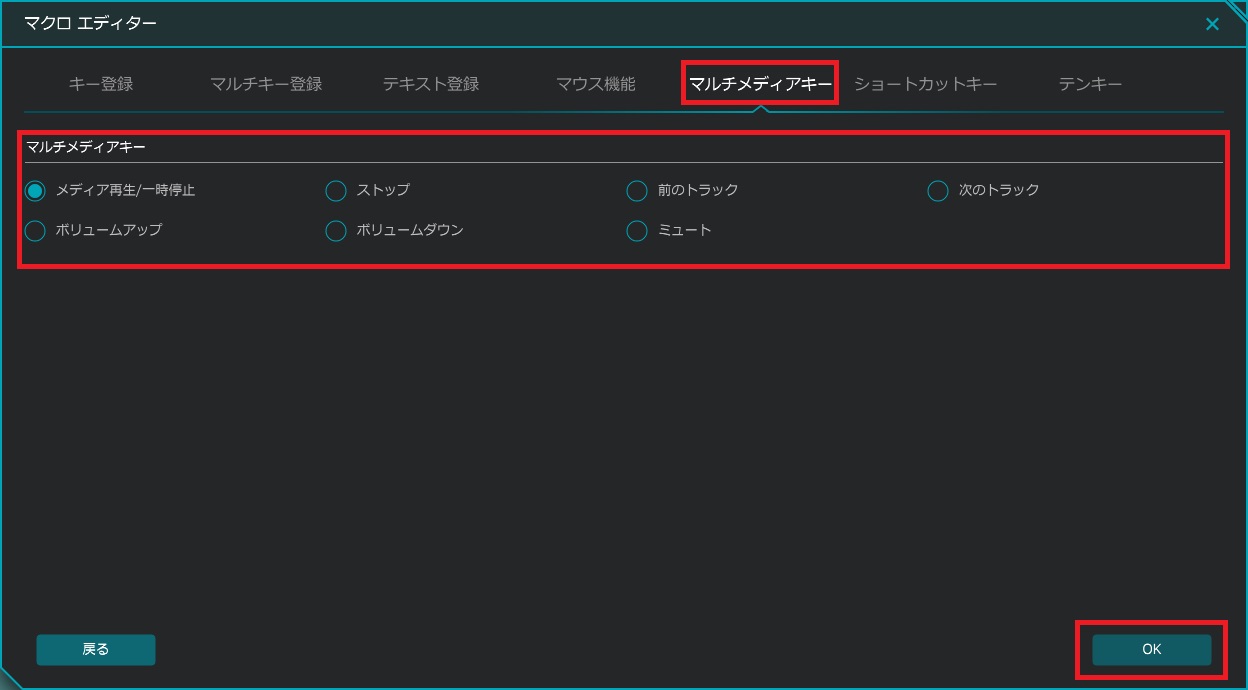
・マルチメディアキー登録
マルチメディアキーをワンクリックでマクロ設定することが可能です。
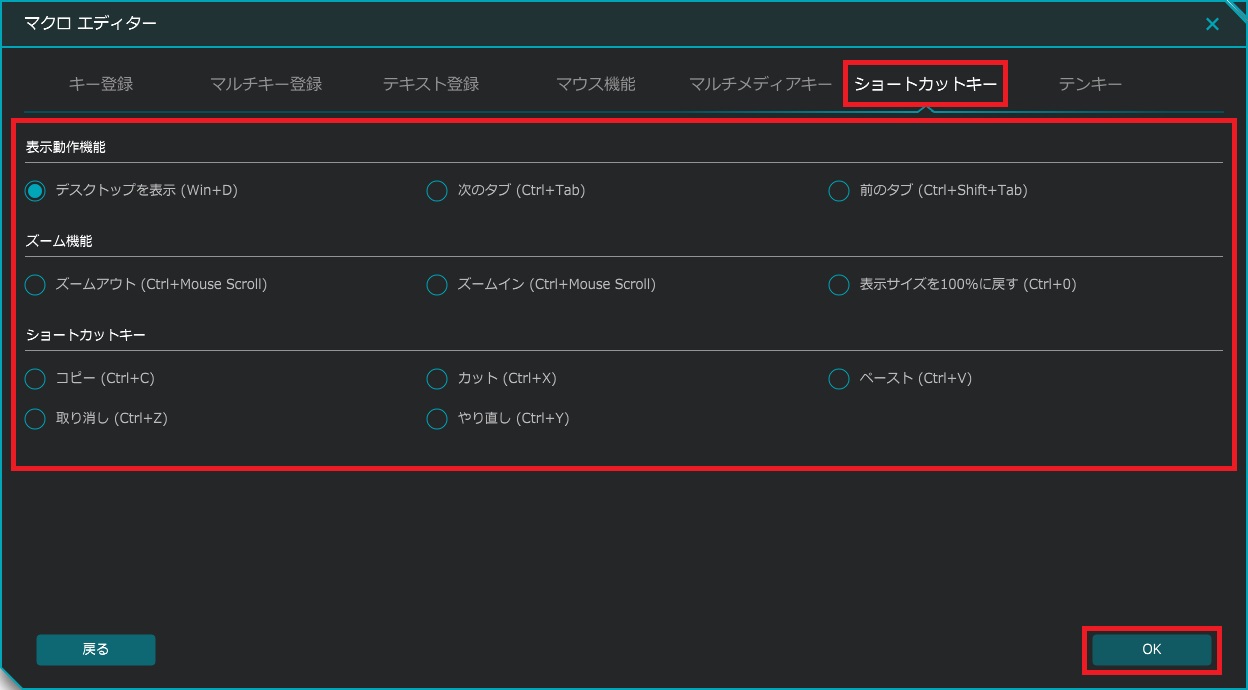
・ショートカットキー登録
よく使う代表的なショートカット―キーをピックアップし、ワンクリックでマクロ設定することが可能です。
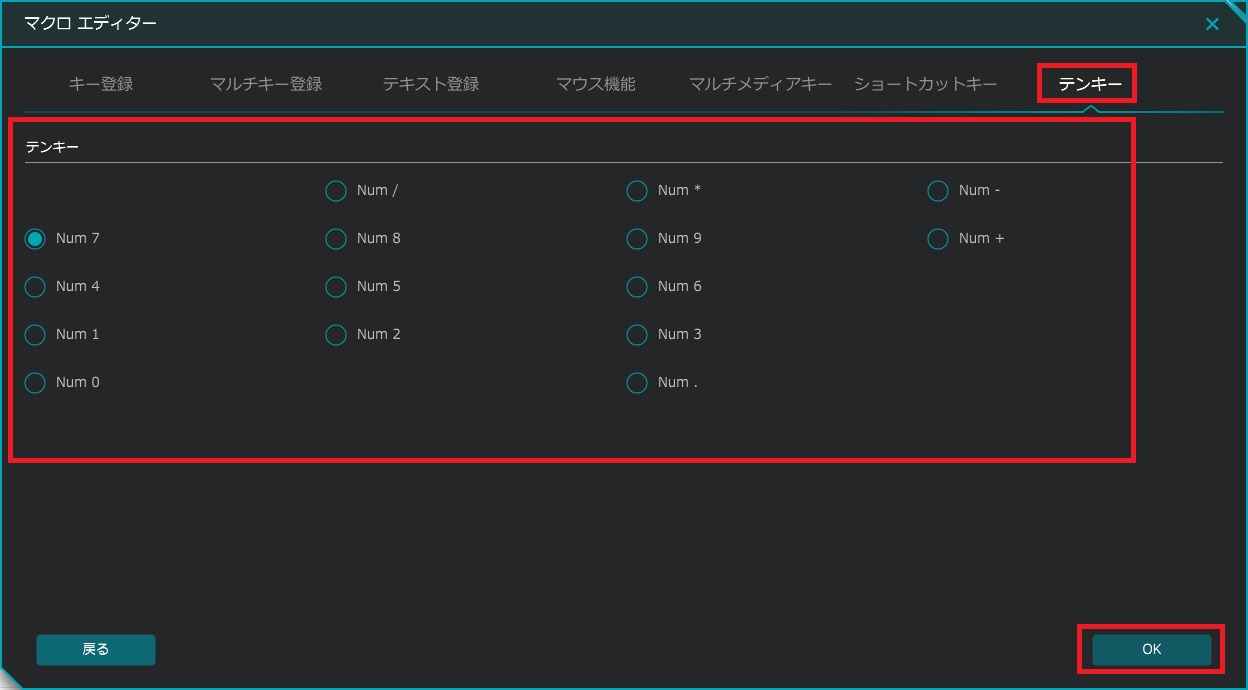
・テンキー登録
テンキーのコードをワンクリックでマクロ設定することが可能です。
2-4.マクロをプロファイルに登録する
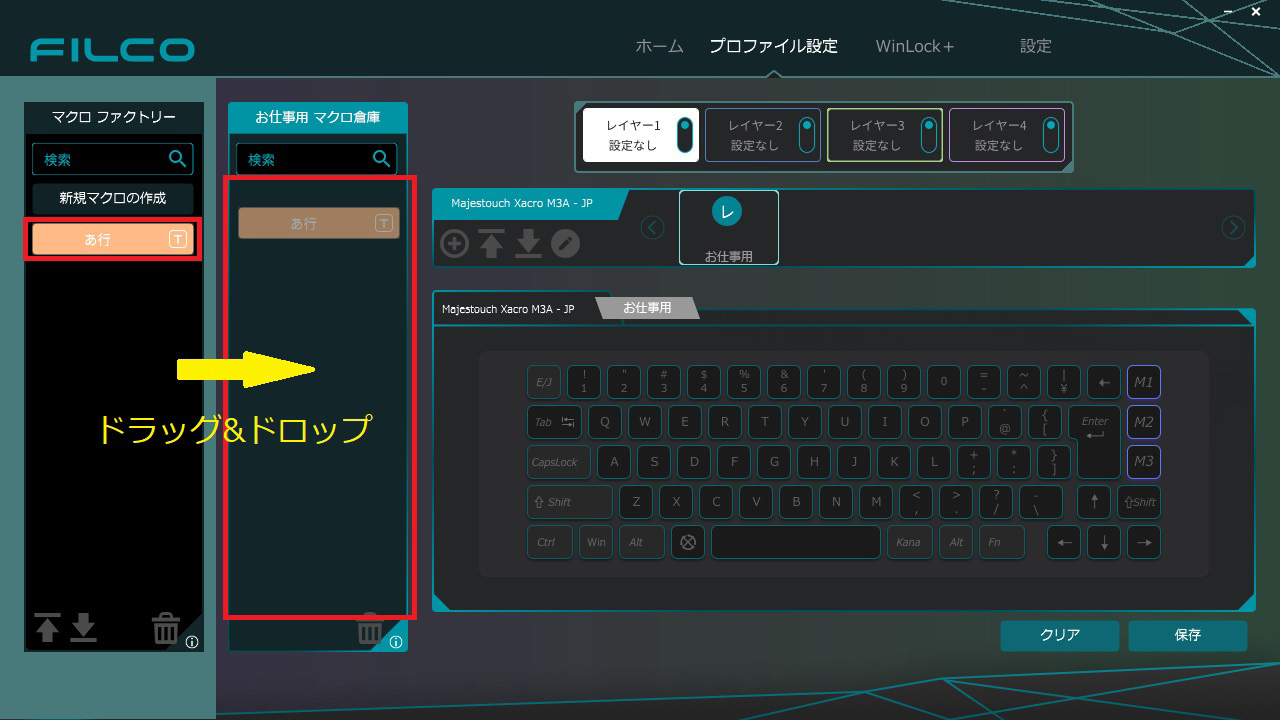
1.マクロファクトリーで作成したマクロをそれぞれのプロファイルのマクロ置き場に移動させます。
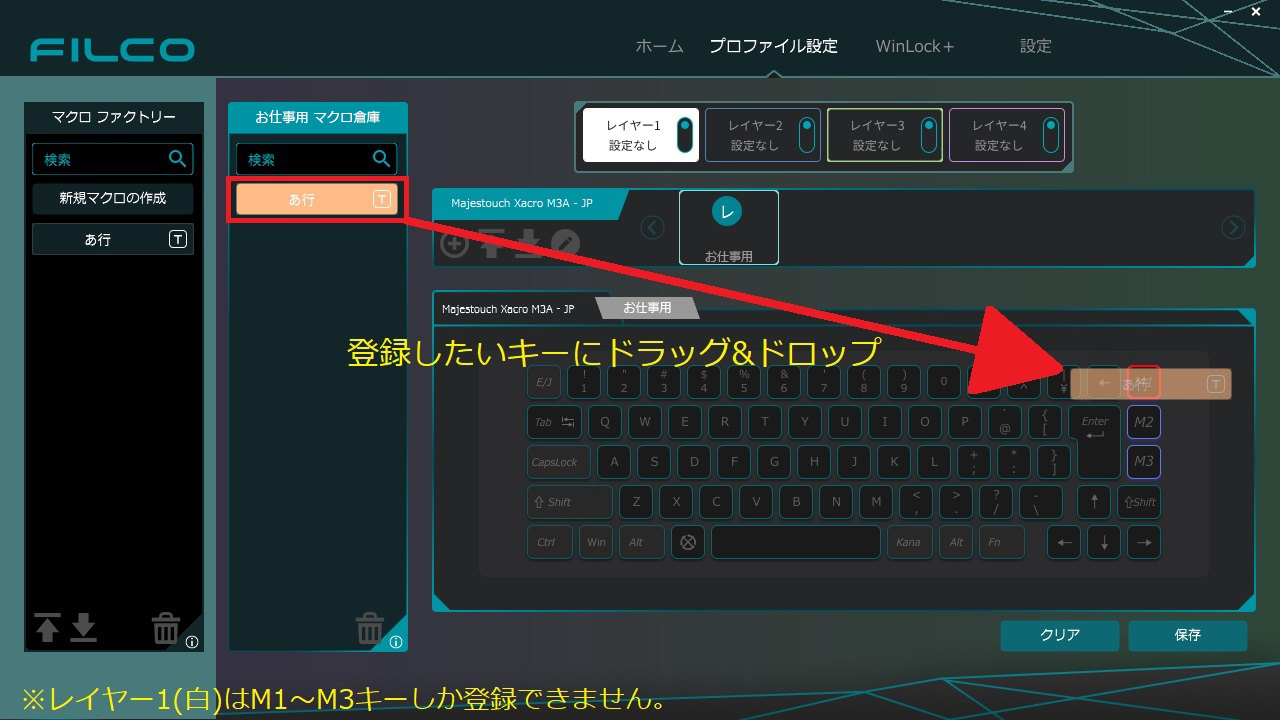
2.プロファイル上の任意のキーに、設定したいマクロをドラッグ&ドロップして保存します。
2-5.作成したプロファイルをレイヤーに設定する
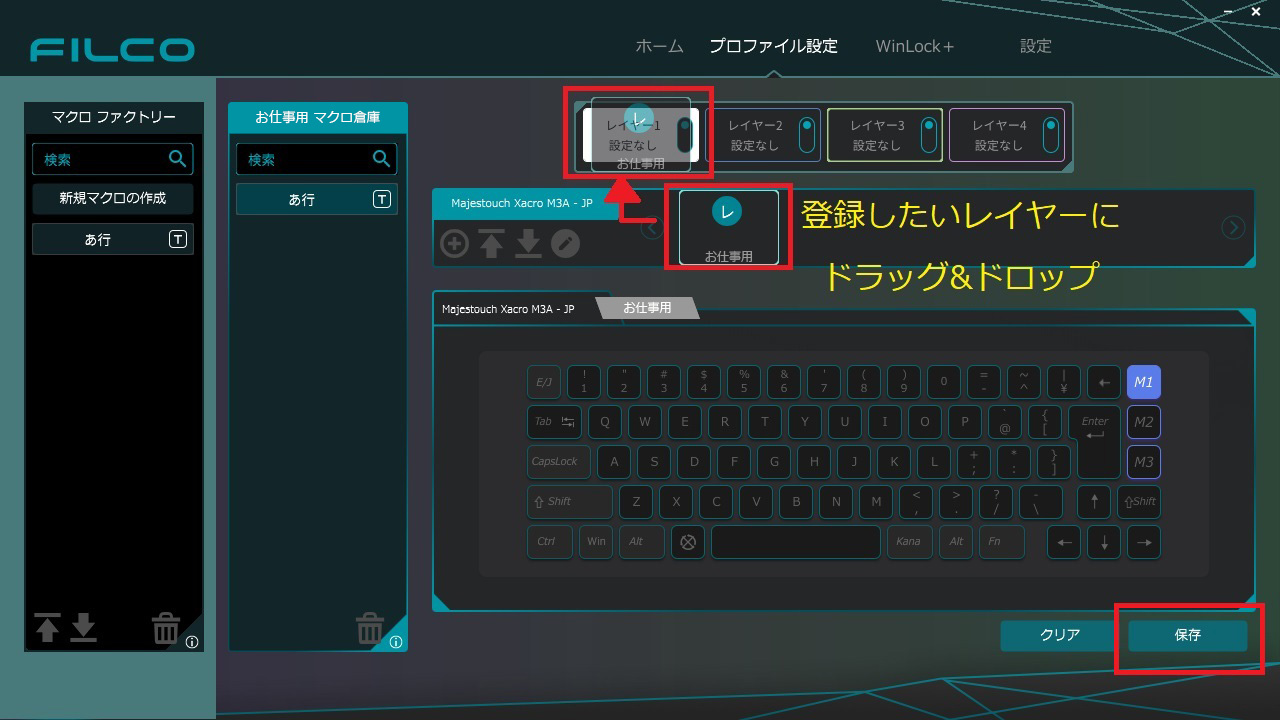
作成したプロファイルをキーボードのレイヤーに割り当てて、初めてコマンドを機能させることができます。
・プロファイルを設定したいレイヤーにドラッグ&ドロップ
・使用中のレイヤーにプロファイルを設定
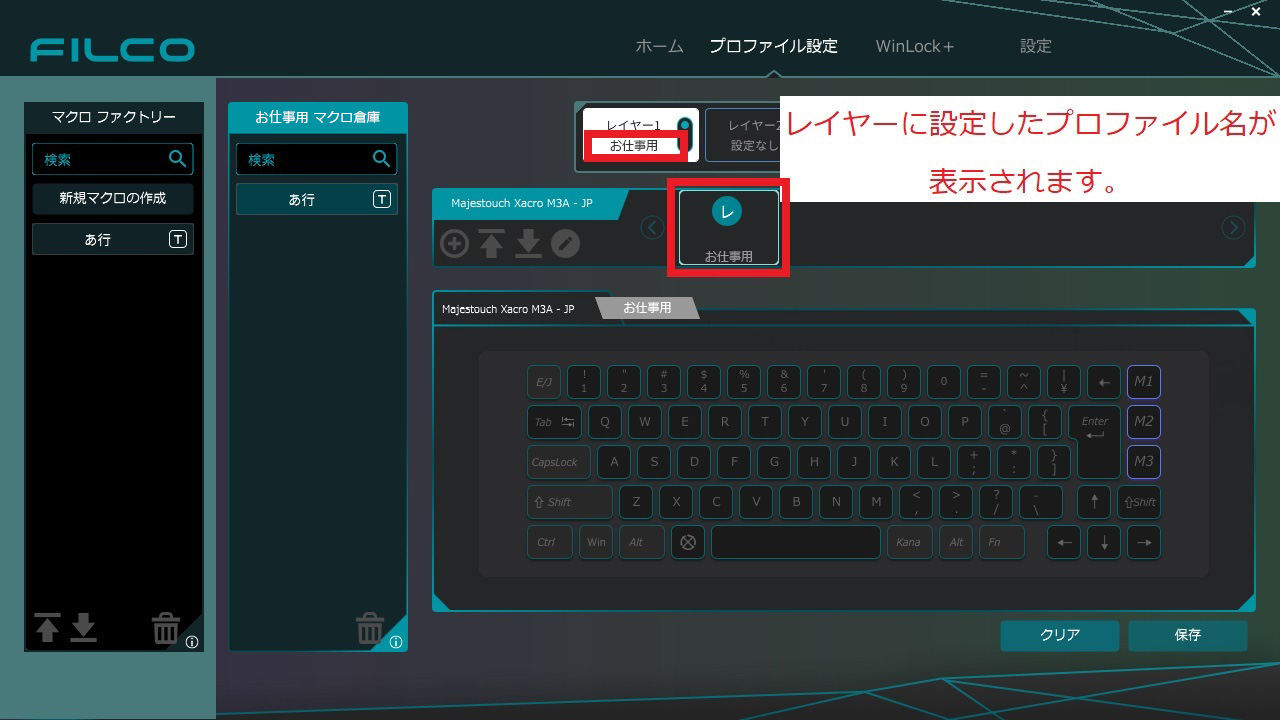
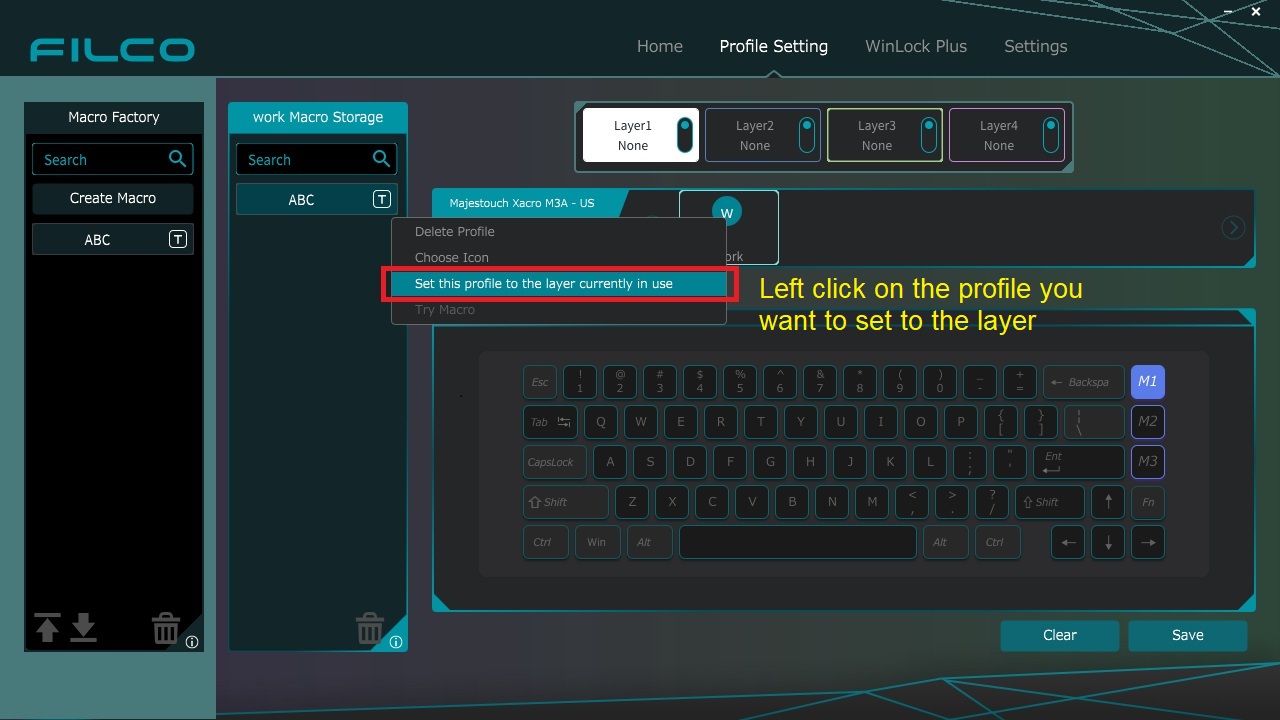
設定したいプロファイルにマウスカーロルを合わせ、左クリックしプルダウン表示から「このプロファイルをレイヤーに設定する」を選択します。
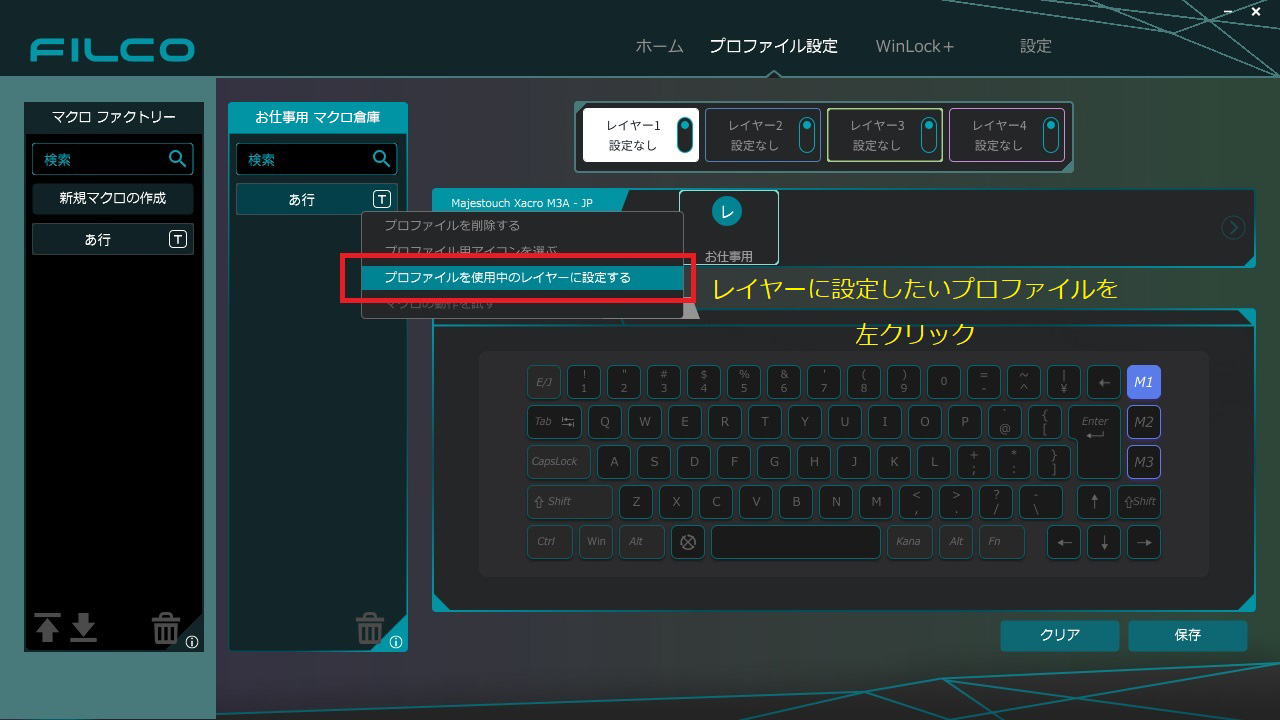
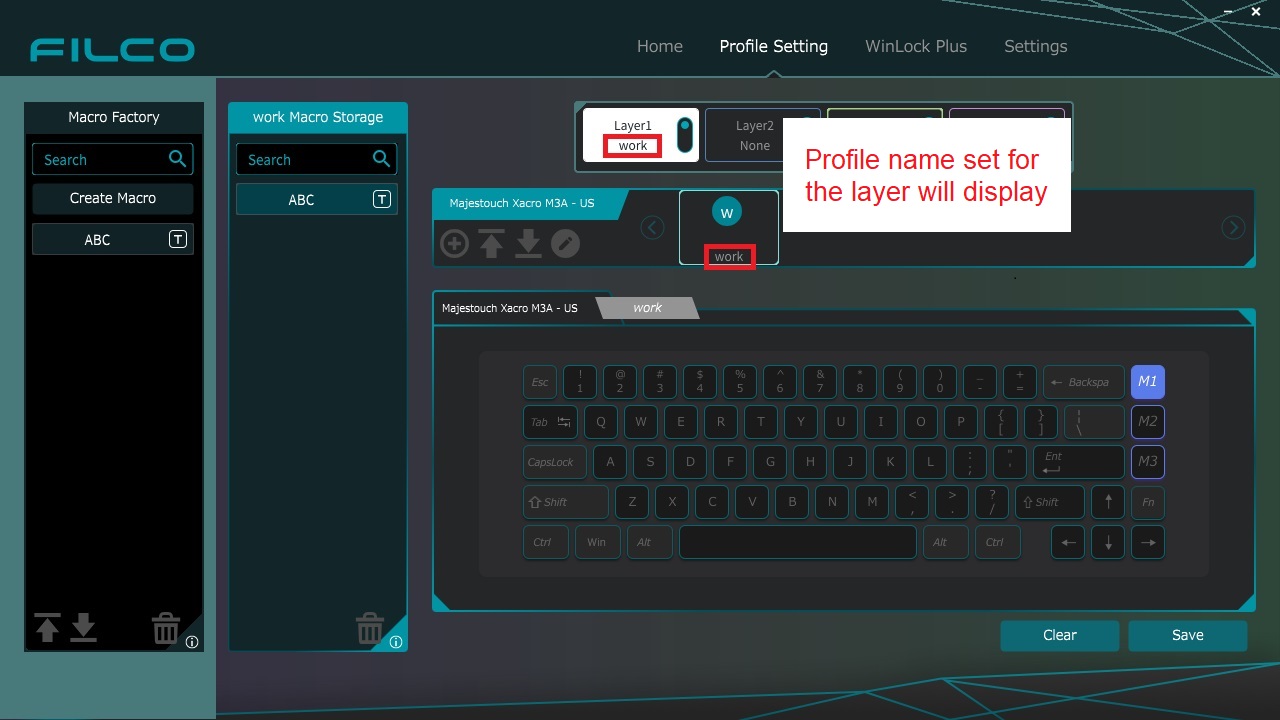
上部レイヤー表示に設定したプロファイル名が表示されたら完了です。
2-7.その他の機能
・プロファイルアイコンデコレーション機能
プロファイルにアイコンを貼り付けることが可能です。比率5:3の絵や画像を用意して貼り付けてください。
※Microsoft Corporationが提供するアプリケーションソフト「ペイント3D」等で簡単に5:3比率にトリミングすることが可能です。

・マクロとプロファイルのエクスポートとインポート機能
プロファイルは8個までしか登録できません。
8個以上のプロファイルを作成したい場合はプロファイルを保存することでPC内に保存できます。
その後保存したプロファイルをFILCO Assistから削除し、再度新しいプロファイルを作成してください。
またPCに保存したプロファイルが必要な場合は「プロファイルを読み込む」で保存したフォルダ内から選択することでFILCO Assistに再度登録できます。
3.WinLockプラス
WinLockプラスは[Fn]+[Alt]+[左Shift]で機能します。
[Fn]、[Alt]、[左Shift]の順でキーを押してください。WinLockプラス機能を解除する場合も、[Fn]、[Alt]、[左Shift]の順でキーを押してください。
Windowsキーをロックする際に、Windowsキー以外に指定したキーの機能も、FILCO Assistにて設定することで同時に無効にする機能です。
ゲームなどで使用する際に、Windowsキーの他にもロックしたいキーを追加できます。
1.「WinLock+」をクリックし、WinLock編集モードにします。
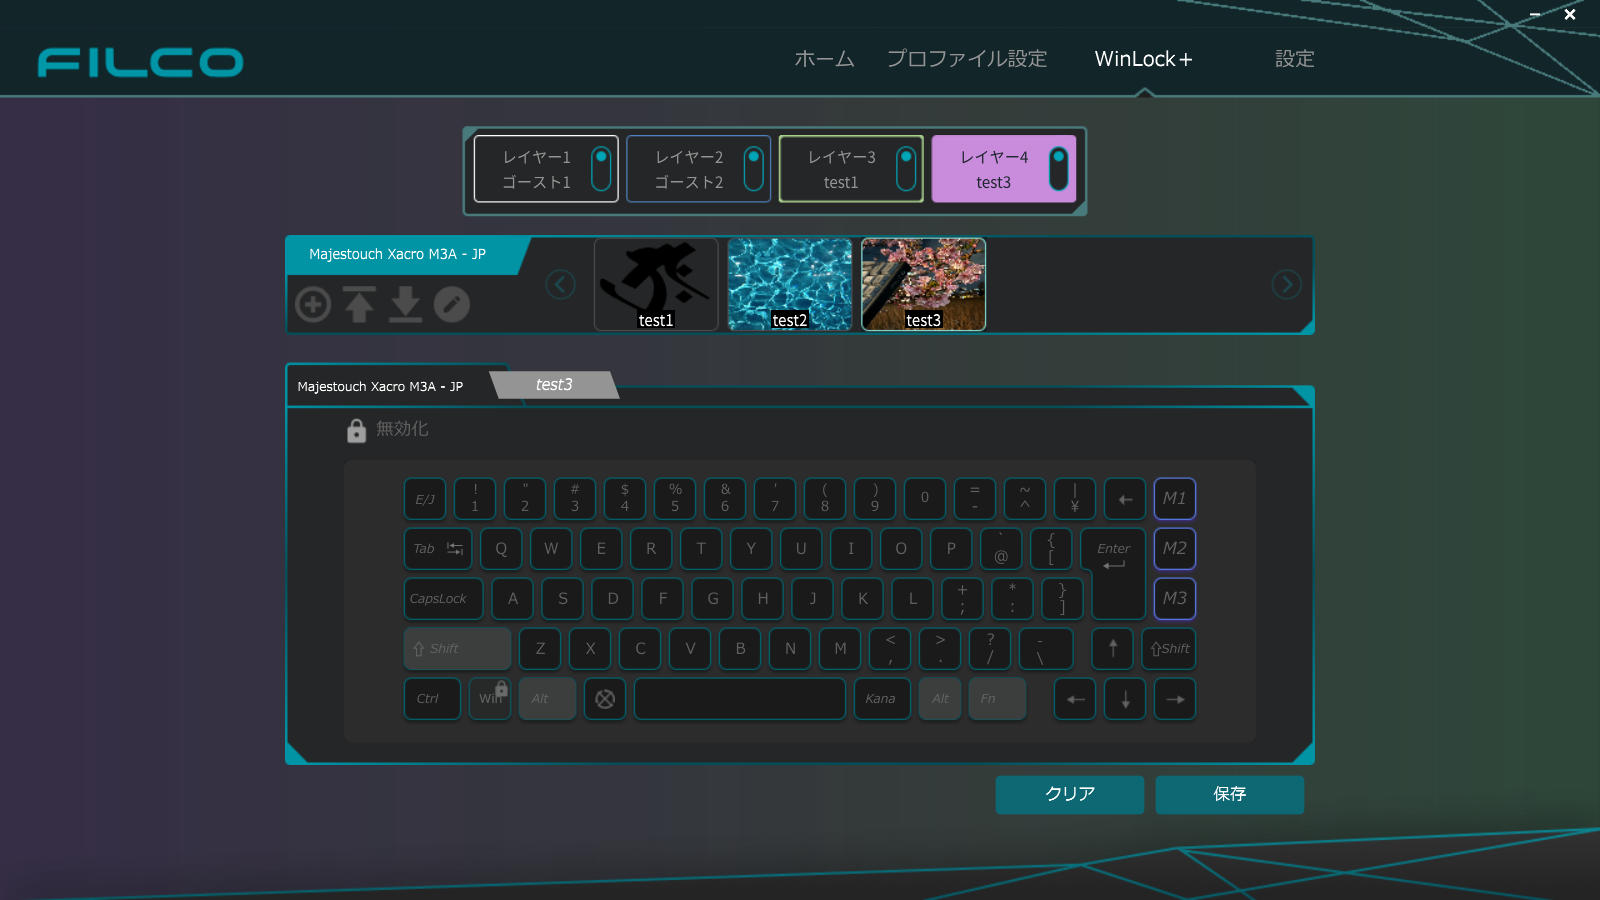
2.無効にしたいキーをクリックします。
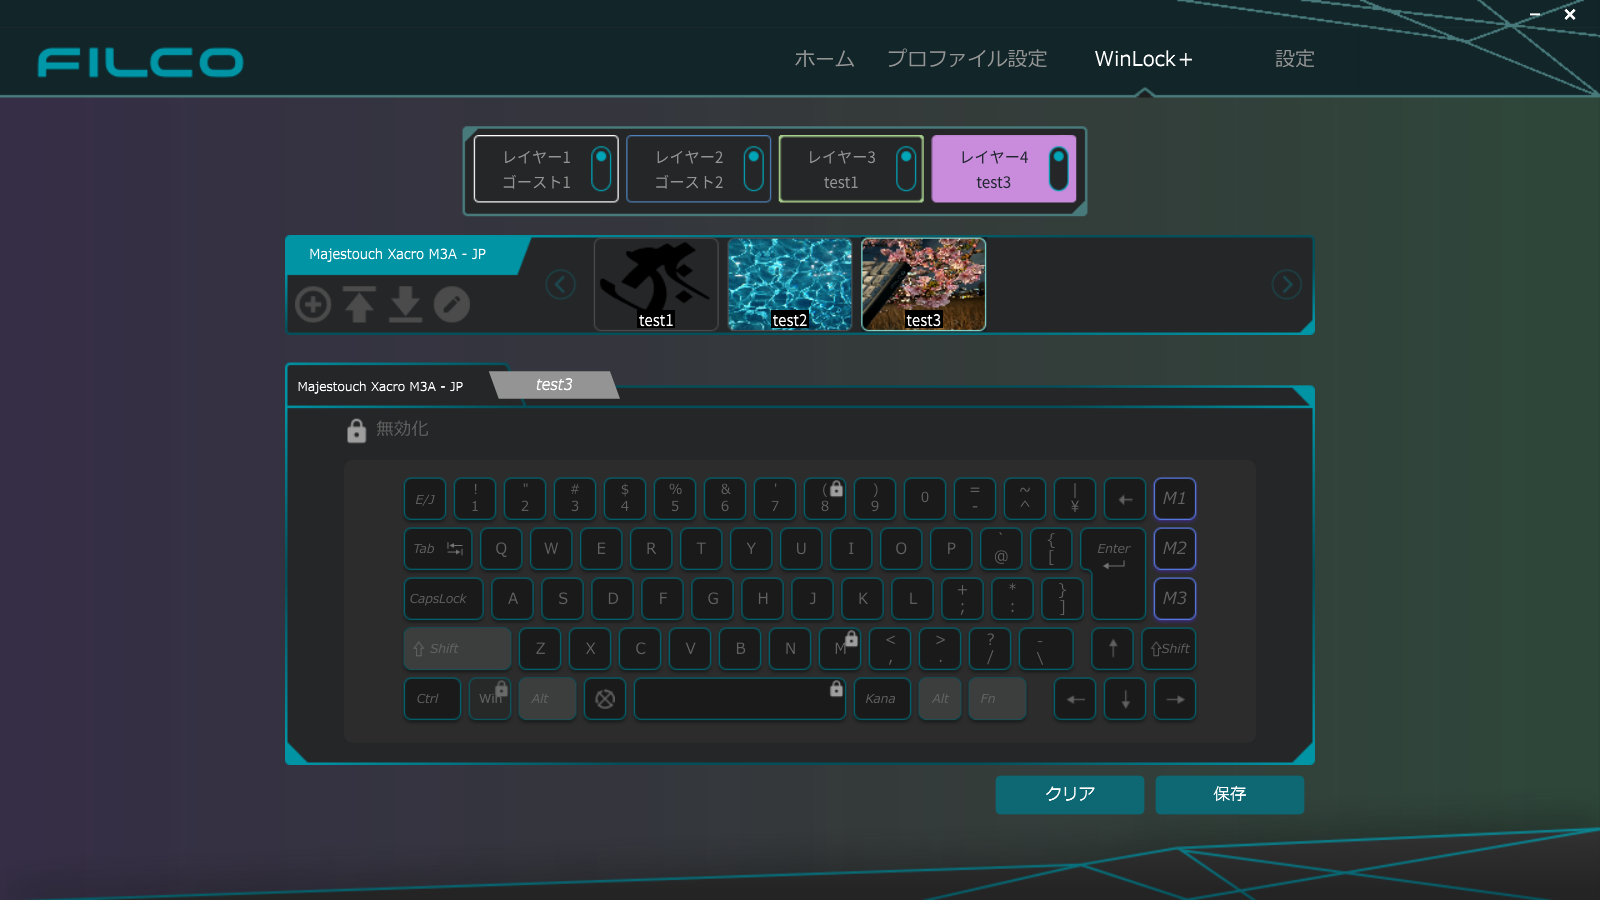
無効にされたキーは、Lockアイコンが表示されます。

3.設定が終わったら、保存ボタンを押してください。
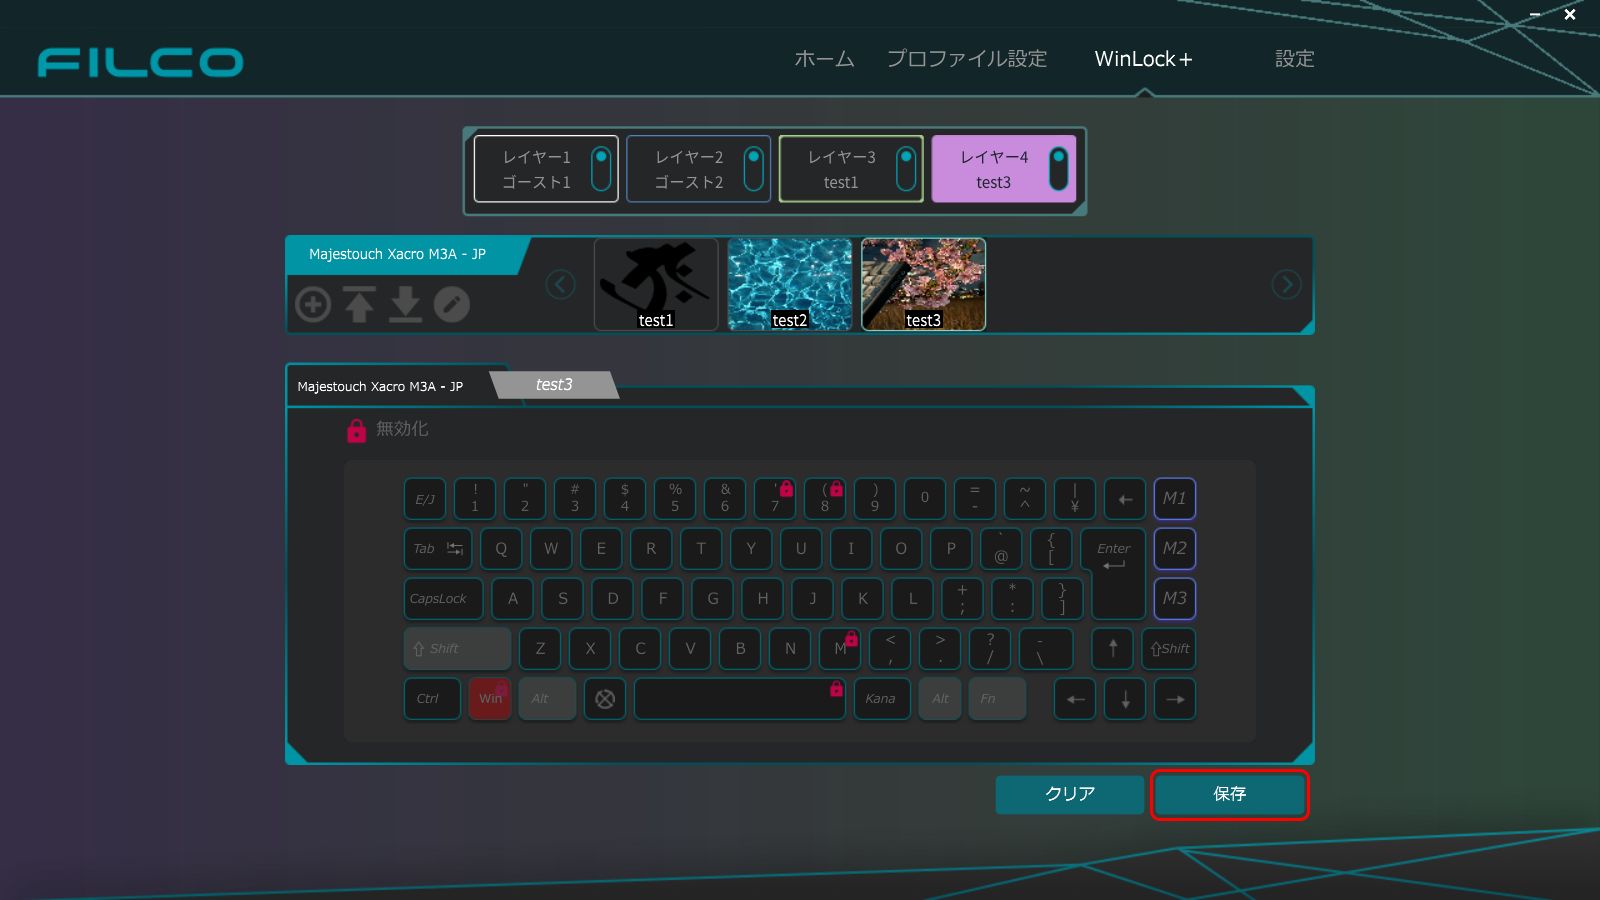
※[Fn]、[Alt]、[左Shift]キーは無効にできません。
※DIPスイッチで位置が変更されるキーをロックした状態で、DIP操作を行った場合、機能がロックしたままの状態で位置が変更されます。
附録1.ダウンロードしたマクロの登録設定方法
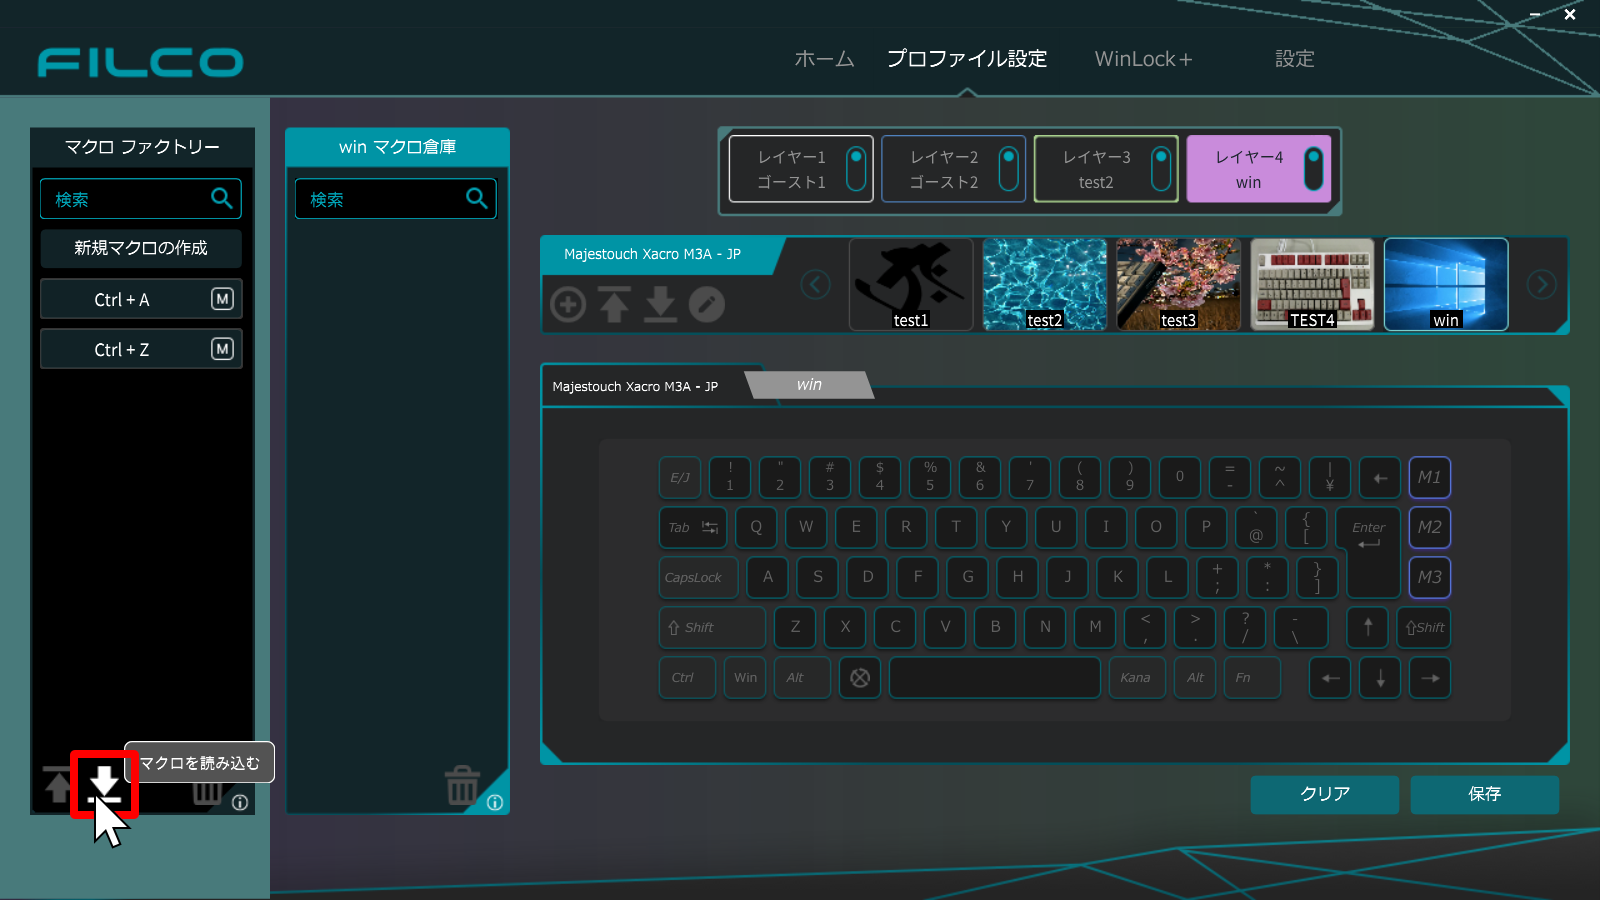
1.登録するプロファイルを選択し、マクロファクトリーの下部の「↓」マークをクリックします。
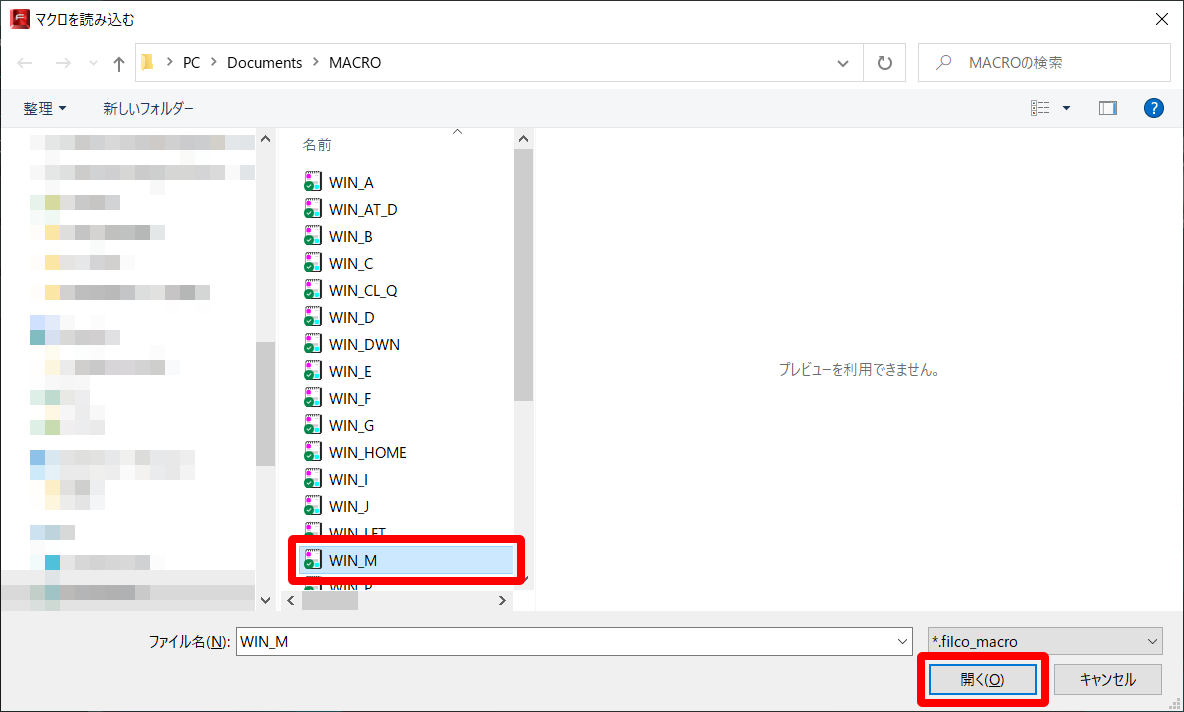
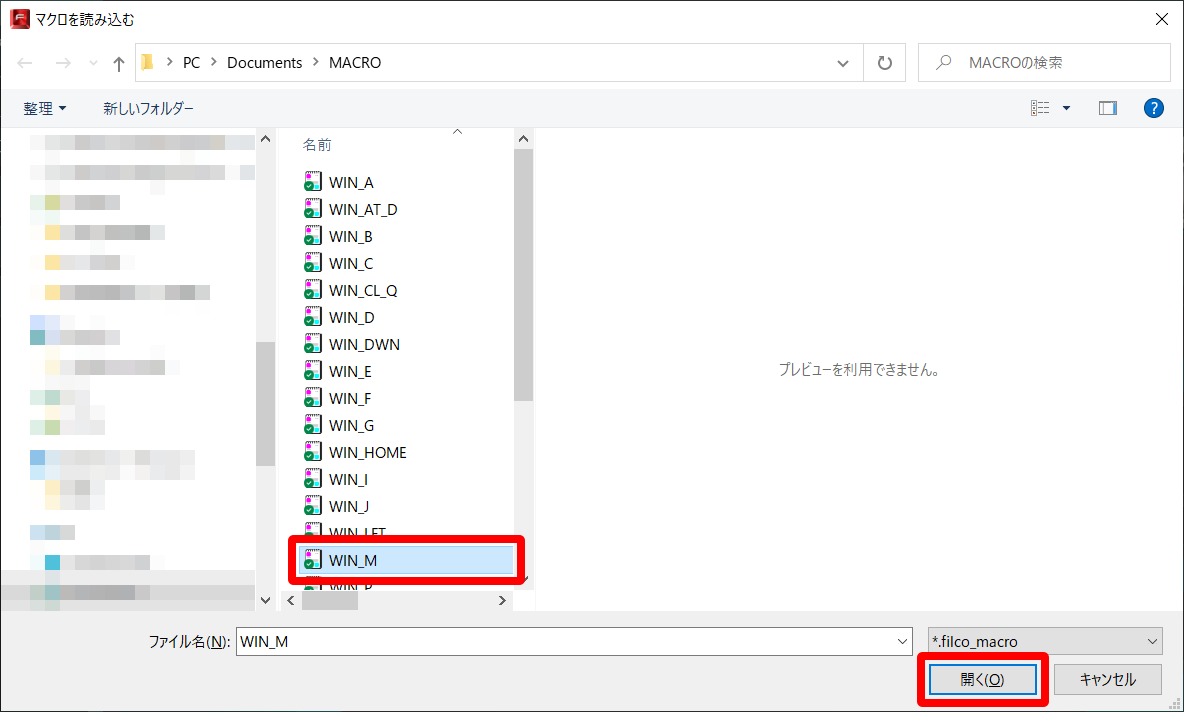
2.エクスプローラーが開くので、読み込ませるマクロを選択し、開くをクリックします。
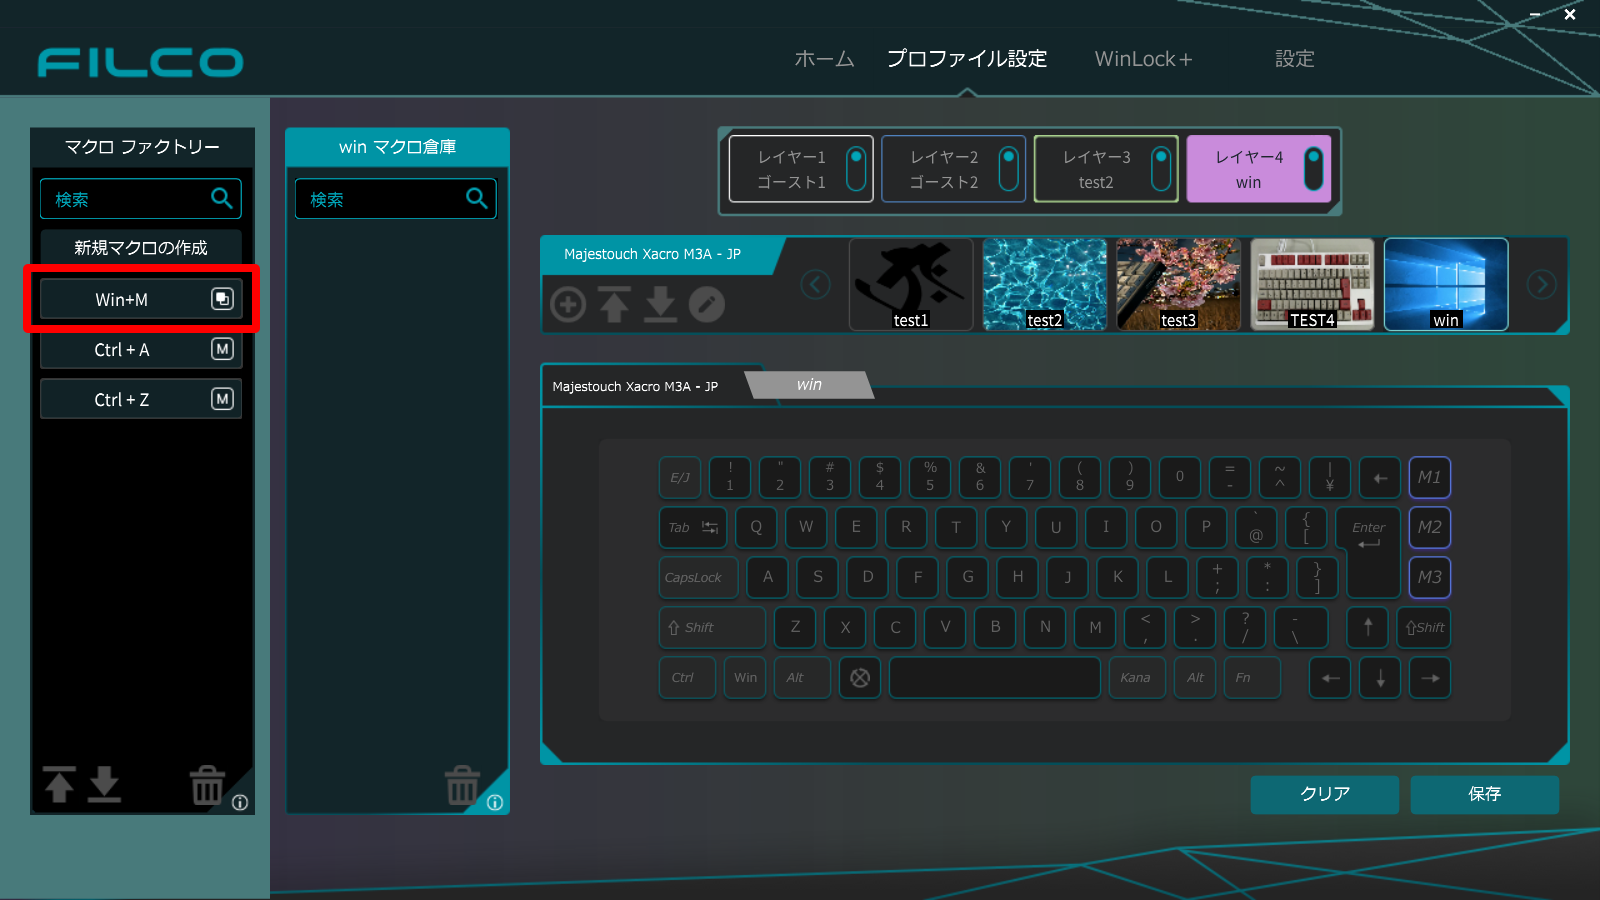
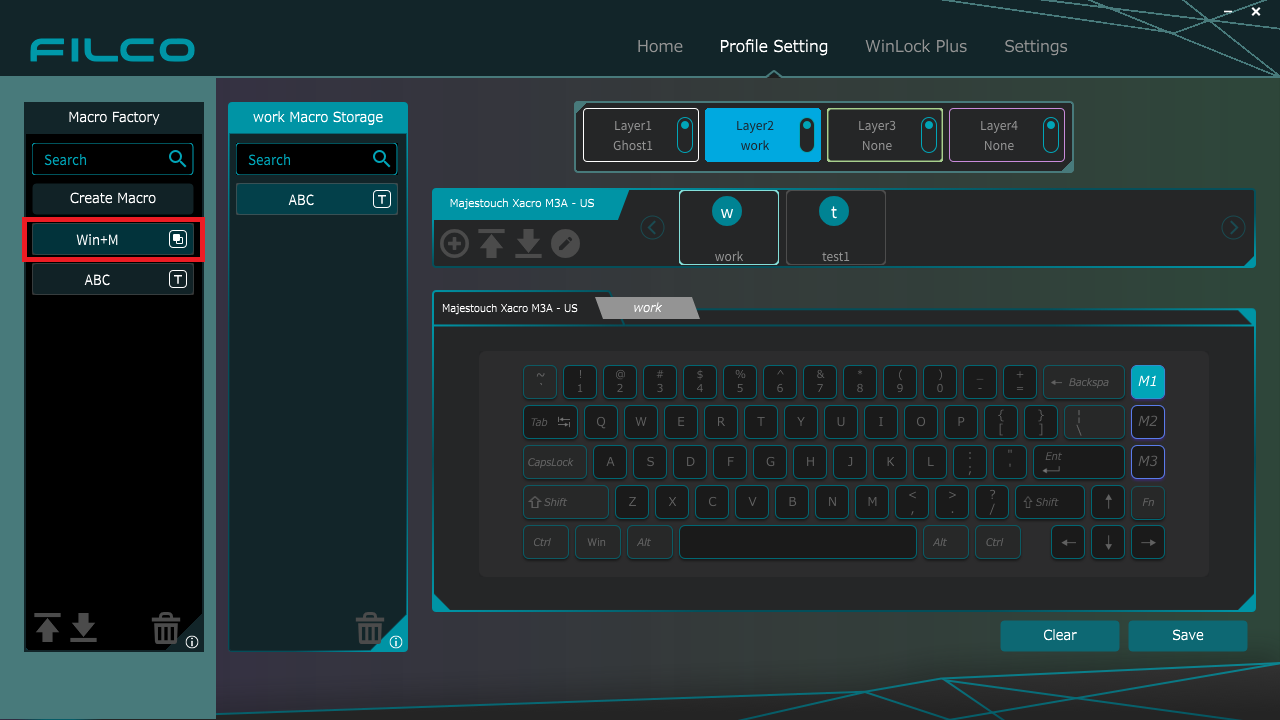
3.読み込んだマクロが、マクロファクトリーに登録されます。
附録2.Windowsキーのショートカットキー一覧
次回以降のソフトウェアバージョンアップでの対応を検討しております。
| ショートカットキー | win11での動作 | win10での動作 | |
|---|---|---|---|
| Windows キー | スタート メニューを開くまたは閉じます | スタート メニューを開くまたは閉じます | |
| Windows キー + A | クイック設定を開きます | アクション センターを開きます | DL |
| Windows キー + B | タスク バーの隅にある最初のアイコンにフォーカスを設定します | 通知領域にフォーカスを設定します | DL |
| Windows キー + C | Microsoft Teams から [チャット] を開きます | Cortana を聞き取りモードで開きます | DL |
| Windows キー + Shift + C | チャーム メニューを開きます | チャーム メニューを開きます | DL |
| Windows キー + Ctrl + C | カラー フィルターを有効にします | ||
| Windows キー + D | デスクトップを表示または非表示にします | デスクトップを表示または非表示にします | DL |
| Windows キー + Alt + D | デスクトップで日付と時刻を表示または非表示にします | DL | |
| Windows キー + E | エクスプローラーを開きます | エクスプローラーを開きます | DL |
| Windows キー + F | フィードバック Hub を開き、スクリーン ショットを撮る | フィードバック Hub を開き、スクリーン ショットを撮る | DL |
| Windows キー + G | ゲームの実行中に Xbox Game Bar を開きます | ゲームの実行中にゲーム バーを開きます | DL |
| Windows キー + Alt + B | HDR のオンとオフを切り替えます | ||
| Windows キー + H | 音声入力を起動します | ディクテーションを開始します | |
| Windows キー + I | [設定]を開きます | [設定]を開きます | DL |
| Windows キー + J | 利用可能な場合は、Windows のヒントにフォーカスを設定します | 利用可能な場合は、Windows のヒントにフォーカスを設定します | DL |
| Windows キー + K | [クイック スタート] から [キャスト] を開きます | [接続] クイックアクションを開きます | |
| Windows キー + L | PC をロックする、またはアカウントを切り替えます | PC をロックする、またはアカウントを切り替えます | |
| Windows キー + M | すべてのウィンドウを最小化します | すべてのウィンドウを最小化します | DL |
| Windows キー + Shift + M | 最小化されたウィンドウをデスクトップに復元します | ||
| Windows キー + N | 通知センターと予定表を開きます | ||
| Windows キー + O | デバイスの向きをロックします | デバイスの向きをロックします | |
| Windows キー + P | プレゼンテーション表示モードを選択します | プレゼンテーション表示モードを選択します | DL |
| Windows キー + Ctrl + Q | クイック アシストを開きます | クイック アシストを開きます | DL |
| Windows キー + R | [ファイル名を指定して実行] ダイアログ ボックスを開きます | [ファイル名を指定して実行] ダイアログ ボックスを開きます | DL |
| Windows キー + Alt + R | (Xbox Game Bar を使用して) フォーカスがあるゲーム ウィンドウのビデオを録画します | ||
| Windows キー + S | 検索を開きます | 検索を開きます | DL |
| Windows キー + Shift + S | 画面の一部のスクリーン ショットを撮影します | 画面の一部のスクリーン ショットを撮影します | DL |
| Windows キー + T | タスク バー上のアプリを順番に切り替えます | タスク バー上のアプリを順番に切り替えます | DL |
| Windows キー + U | アクセシビリティの設定を開きます | コンピューターの簡単操作センターを開きます | |
| Windows キー + V | クリップボードを開きます | クリップボードを開きます | DL |
| Windows キー + Shift + V | 通知にフォーカスを設定します | 通知を順番に切り替えます | |
| Windows キー + W | ウィジェットを開きます | ||
| Windows キー + X | [クイック リンク] メニューを開きます | [クイック リンク] メニューを開きます | |
| Windows キー + Y | Windows Mixed Reality とデスクトップの間で入力を切り替えます | Windows Mixed Reality とデスクトップの間で入力を切り替えます | |
| Windows キー + Z | スナップ レイアウトを開きます | 全画面表示モードのアプリで使用できるコマンドを表示します | |
| Windows キー + 「 . 」または「 ; 」 | 絵文字パネルを開きます | 絵文字パネルを開きます | |
| Windows キー + 「 , 」 | デスクトップを一時的にプレビューします | デスクトップを一時的にプレビューします | |
| Windows キー + Pause | [設定] > [システム] > [バージョン情報] を開きます | [システムのプロパティ] ダイアログ ボックスを表示します | |
| Windows キー + Ctrl + F | PC を検索する (ネットワークに参加している場合) | PC を検索する (ネットワークに参加している場合) | |
| Windows キー + Shift + M | 最小化されたウィンドウをデスクトップに復元します | ||
| Windows キー + 数字 | デスクトップを開き、タスク バー上の数字で示す位置にピン留めされているアプリを開始します アプリが既に実行されている場合は、そのアプリに切り替えます | デスクトップを開き、タスク バー上の数字で示す位置にピン留めされているアプリを開始します アプリが既に実行されている場合は、そのアプリに切り替えます | |
| Windows キー + Shift + 数字 | デスクトップを開き、タスク バー上の数字で示す位置にピン留めされているアプリの新しいインスタンスを開始します | デスクトップを開き、タスク バー上の数字で示す位置にピン留めされているアプリの新しいインスタンスを開始します | |
| Windows キー + Ctrl + 数字 | デスクトップを開き、タスク バー上の数字で示す位置にピン留めされているアプリの前回の作業中のウィンドウに切り替えます | デスクトップを開き、タスク バー上の数字で示す位置にピン留めされているアプリの前回の作業中のウィンドウに切り替えます | |
| Windows キー + Alt + 数字 | デスクトップを開き、タスク バー上の数字で示す位置にピン留めされているアプリのジャンプ リストを開きます | デスクトップを開き、タスク バー上の数字で示す位置にピン留めされているアプリのジャンプ リストを開きます | |
| Windows キー + Ctrl + Shift + 数字 | デスクトップを開き、タスク バー上の指定された位置にあるアプリの新しいインスタンスを管理者として開きます | デスクトップを開き、タスク バー上の指定された位置にあるアプリの新しいインスタンスを管理者として開きます | |
| Windows キー + Tab | タスク ビューを開きます | タスク ビューを開きます | DL |
| Windows キー + ↑ | ウィンドウを最大化します | ウィンドウを最大化します | DL |
| Windows キー + Shift + ↑ | 画面の上半分にフォーカスがあるウィンドウをスナップします | ||
| Windows キー + ↓ | 現在のアプリを画面から削除する、またはデスクトップ ウィンドウを最小化します | 現在のアプリを画面から削除する、またはデスクトップ ウィンドウを最小化します | DL |
| Windows キー + Shift + ↓ | 画面の下半分にフォーカスがあるウィンドウをスナップします | ||
| Windows キー + ← | 画面の左側にアプリまたはデスクトップ ウィンドウを最大化します | 画面の左側にアプリまたはデスクトップ ウィンドウを最大化します | DL |
| Windows キー + → | 画面の右側にアプリまたはデスクトップ ウィンドウを最大化します | 画面の右側にアプリまたはデスクトップ ウィンドウを最大化します | DL |
| Windows キー + Home | 作業中のデスクトップ ウィンドウを除くすべてのウィンドウを最小化します (2 回目のキーストロークですべてのウィンドウを復元します) | 作業中のデスクトップ ウィンドウを除くすべてのウィンドウを最小化する (2 回目のキーストロークですべてのウィンドウを復元する) | DL |
| Windows キー + Shift + ↑ | デスクトップ ウィンドウを画面の上下に拡大します | デスクトップ ウィンドウを画面の上下に拡大します | |
| Windows キー + Shift + ↓ | 作業中のデスクトップ ウィンドウを、幅を維持しながら、縦方向に元のサイズに戻すか最小化します | 作業中のデスクトップ ウィンドウを、幅を維持しながら、縦方向に元のサイズに戻すか最小化します | |
| Windows キー + Shift + ←または→ | デスクトップ上のアプリまたはウィンドウを別のモニター ディスプレイに移動します | デスクトップ上のアプリまたはウィンドウを別のモニター ディスプレイに移動します | |
| Windows キー + Shift + Space キー | 言語とキーボードレイアウトを逆に回します | ||
| Windows キー + Space キー | 入力言語とキーボード レイアウトを切り替えます | 入力言語とキーボード レイアウトを切り替えます | |
| Windows キー + Ctrl + Space キー | 以前に選択されていた入力値に変更します | 以前に選択されていた入力値に変更します | |
| Windows キー + Ctrl + Enter | ナレーターをオンにします | ナレーターをオンにします | |
| Windows キー + 「 + 」 | 拡大鏡を開き、拡大します | 拡大鏡を開きます | |
| Windows キー + 「 - 」 | 拡大鏡で縮小します | ||
| Windows キー + Esc | 拡大鏡を閉じます | ||
| Windows キー + 「 / 」 | IME の再変換を開始します | IME の再変換を開始します | DL |
| Windows キー + Ctrl + V | ショルダー タップを開きます | ||
| Windows キー + Ctrl + Shift + B | PC のブランク画面またはブラックスクリーンから復帰します | PC のブランク画面またはブラックスクリーンから復帰します | |
| Windows キー + Prt Scr | 全画面のスクリーンショットをファイルに保存します | ||
| Windows キー + Alt + Prt Scr | (Xbox Game Barを使用して)フォーカスがあるゲーム ウィンドウのスクリーンショットをファイルに保存します |
FILCO ASSIST Operation Manual
Thank you for purchasing FILCO® keyboard.
FILCO keyboard is ideally designed to be intuitive and efficient to use.
FILCO Majestouch Xacro series not only allows you to change key codes using hardware macro functions and program key input patterns, but also enables software programming using the dedicated Xacro software "FILCO Assist".
On the home screen of FILCO Assist, you can check the status of the keyboard DIP switches and key settings at a glance. In addition, it is very easy-to-use software that allows you to easily create your own original keyboard profile simply by creating macro registration and text registration while checking on the monitor and simply dragging and dropping.
Enjoy a better PC life by combining FILCO Majestouch Xacro series and "FILCO Assist".
Contents
1-2.Setting the hardware (keyboard)
2.Create a profile and register macros
・Text Block registration (software text registration function)
2-5.Set the created profile as a layer
・Profile icon decoration function
・Export and import functions for macros and profiles
1.Preparation
1-1.Software installation
Please read the software license agreement carefully and install the software only on agreement.
1-2.Setting the hardware (keyboard)
Turn ON the DIP switch (11) on the back to enable the programming function.
1-3.Setting the software
Start FILCO Assist and open the "Settings" tab on the right side.
・Language selection (Japanese/English)
・Software Version information
・Firmware Version information
・Notification setting (ON/OFF)
・Software automatic start (ON/OFF)
・Reset (execute from software)
* Keyboard format will take about 30 seconds.
* After formatting the keyboard, reconnect the USB cable to use. (Remove and re-insert the USB)
1-4.Using software
You can check the status of the keyboard on the "Home" tab.
・Check the status of the DIP switch of the connected keyboard
・Confirm key settings for each layer
On the "Profile Setting" tab, you can create macros, create profiles, and set macros to profiles.
Macro Create Area:
Macros are created in Macro Factory and stored in each profile's Macro Storage.
Layer Setting Area:
Here you can set "change layer (specify and right click)", "set profile to layer (drop)", and "set/release overwrite lock on layer".
Profile Setting Area:
A list of profiles is displayed. The status of the selected profile is displayed on the keyboard diagram.
2.Create profile and register macro
2-1. Profile creation
This software is for creating a profile that creates commands and assigns them to each key. By setting the profile to the keyboard, you can make an original keyboard.
Without creating a profile, you cannot assign macros, text, or set keylocks.
1.Create profile and save with name.
Click the button to generate the profile.
Name and press the "OK" button, and will be saved in to the profile storage.
Up to 8 profiles can be created.
2-2.Create Macro
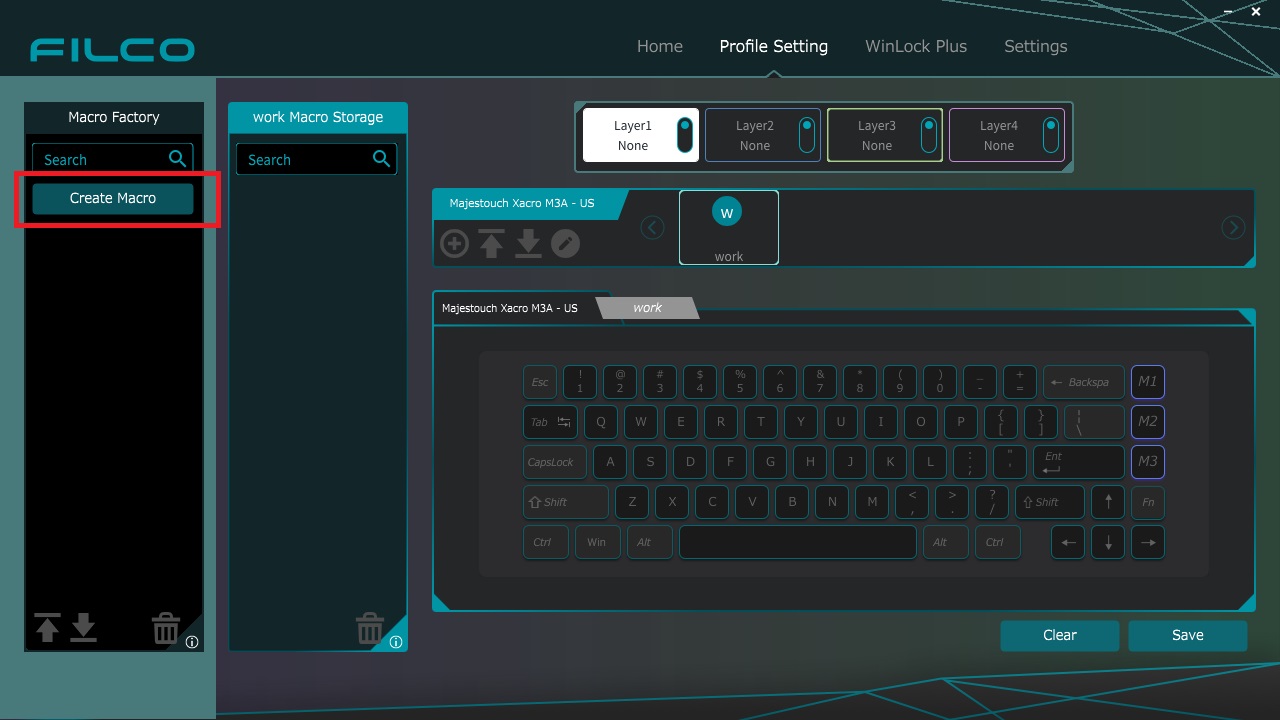
1.Click the Create Macro button in the Macro Factory on the left.
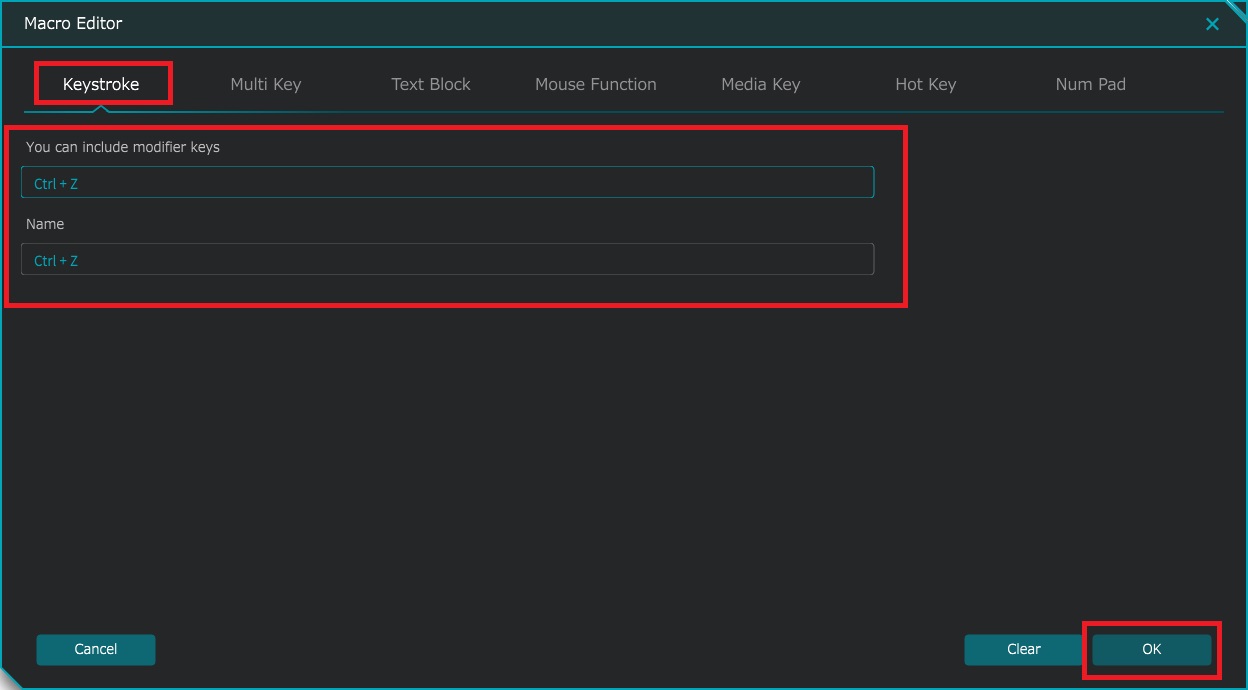
2."Macro Editor" screen will pop up.
2-3.Macro Editor tab function
・Keystroke registration
Keystrokes and shortcut keys can be registered.
How to register keystroke:
Enter any key in the [Input text] frame and click the OK button to save.
How to register a shortcut key:
When registering "Ctrl + Z", pressing "Ctrl" → "Z" in order will display "Ctrl + Z" in the frame.
Click the OK button to save.
* Pressing only the Ctrl key does not respond. "ALT + ●" and "Shift + ●" can also be registered in the same way.
Note 2:In key registration, shortcut for Windows keys cannot be set.
For Windows key shortcut key registration, please create in the professional mode of multi-key registration, or download from the Windows key shortcut key list to use.
Click here for how to register the downloaded macro↓
Click here for a list of Windows key shortcuts↓
・Multi Key registration
Multi key registrations can be combined to execute a series of inputs with a single keystroke.
Multi key can be set to record or specify the order in which the keys are entered and the input speed, and output in that order.
Unlike keystrokes, it is possible to combine multiple character keys other than modifier keys.
Also, in professional mode, it is possible to set the key change of keystrokes and the interval in detail.
* Up to 32 keystrokes can be registered (equivalent to hardware macros).
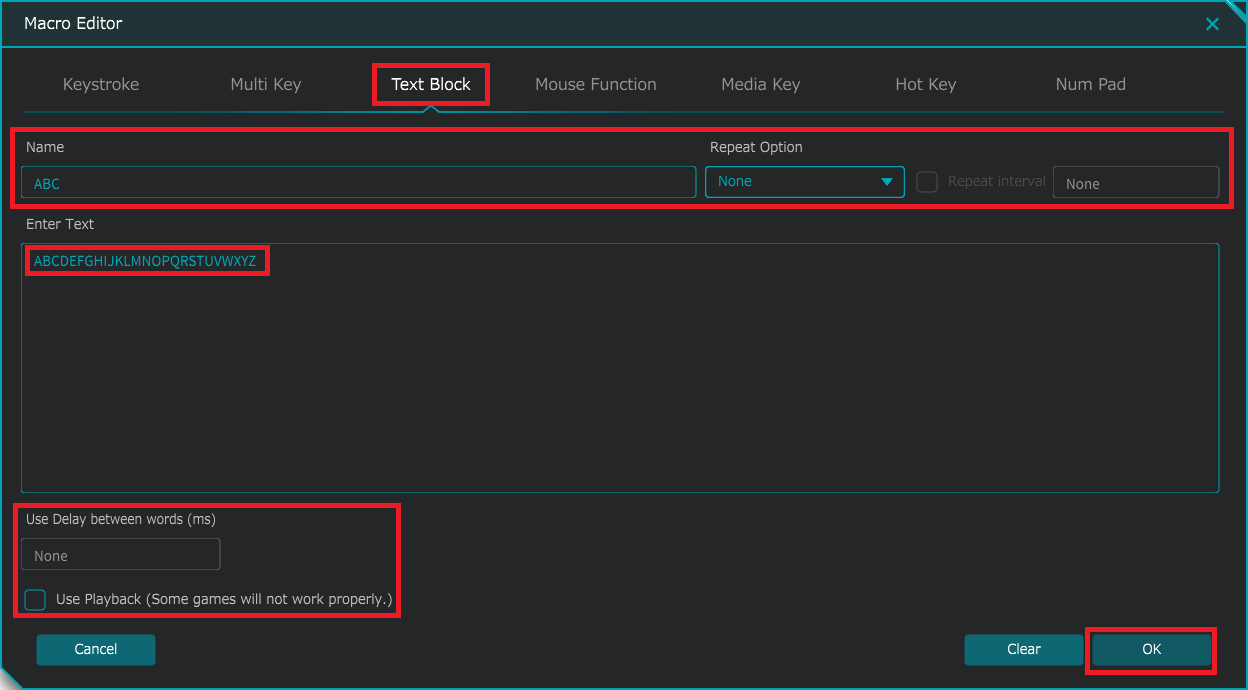
・Text Block (software text registration function)
Text can be registered in FILCO Assist.
It also supports copy and paste, and you can specify repeat options and keystroke intervals, so you can easily create captions.
(*Repeat options and keystroke settings may not be available depending on the software used.)
Note: Since the "Text Block" macro saves data in FILCO Assist, it will only work on the PC where the macro is set. In this time, FILCO Assist must be running in the background, otherwise it will not work.
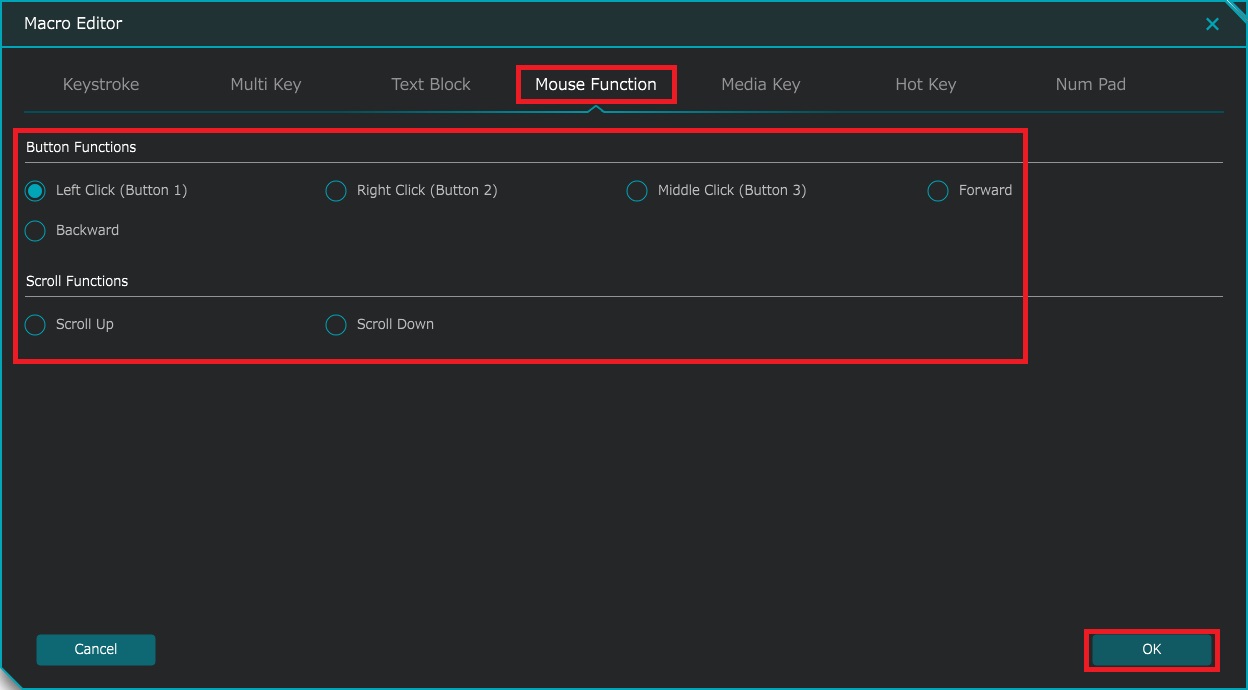
・Mouse Function registration
Mouse movement can be set as a macro with one click.
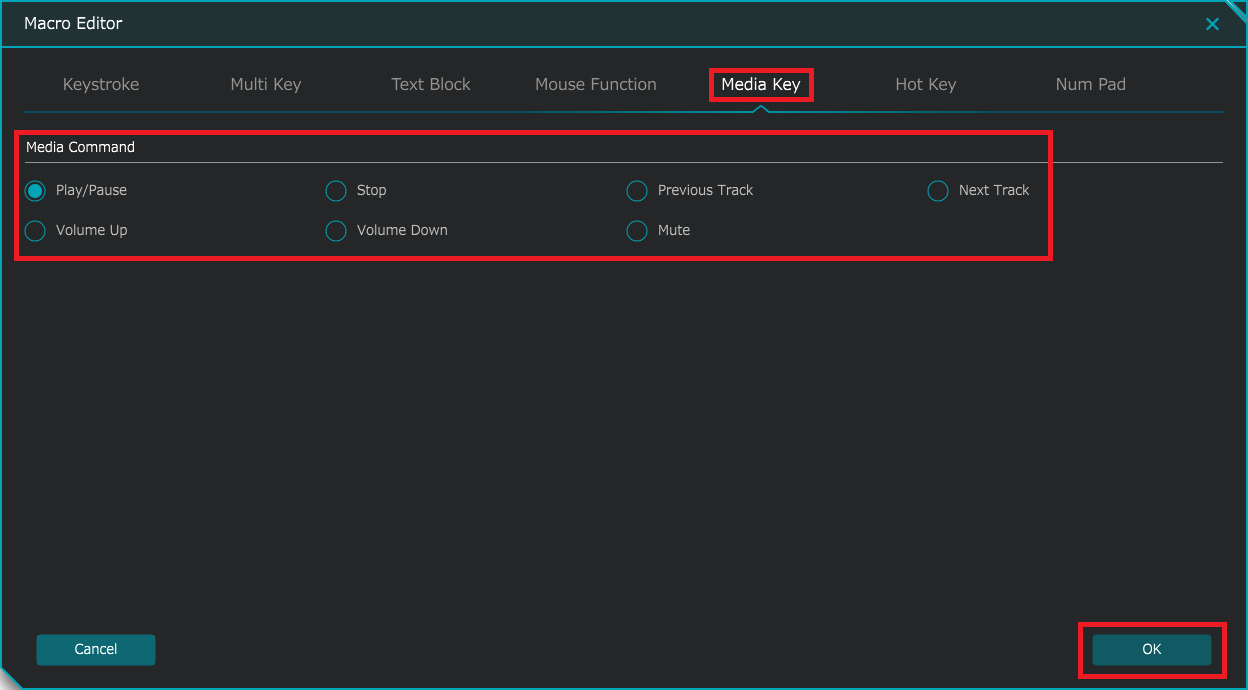
・Media key registration
Multimedia keys can be set to macros with a single click.
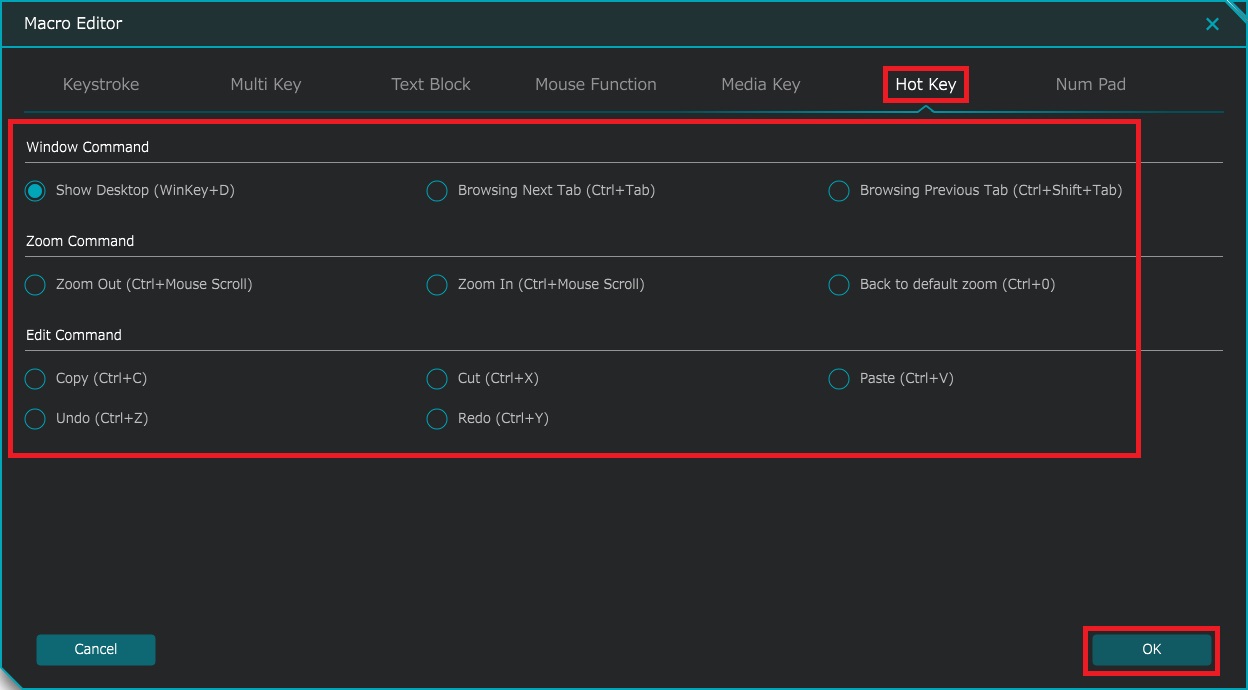
・Hot key registration
Picking up representative shortcut keys that are often used and set macros with one click.
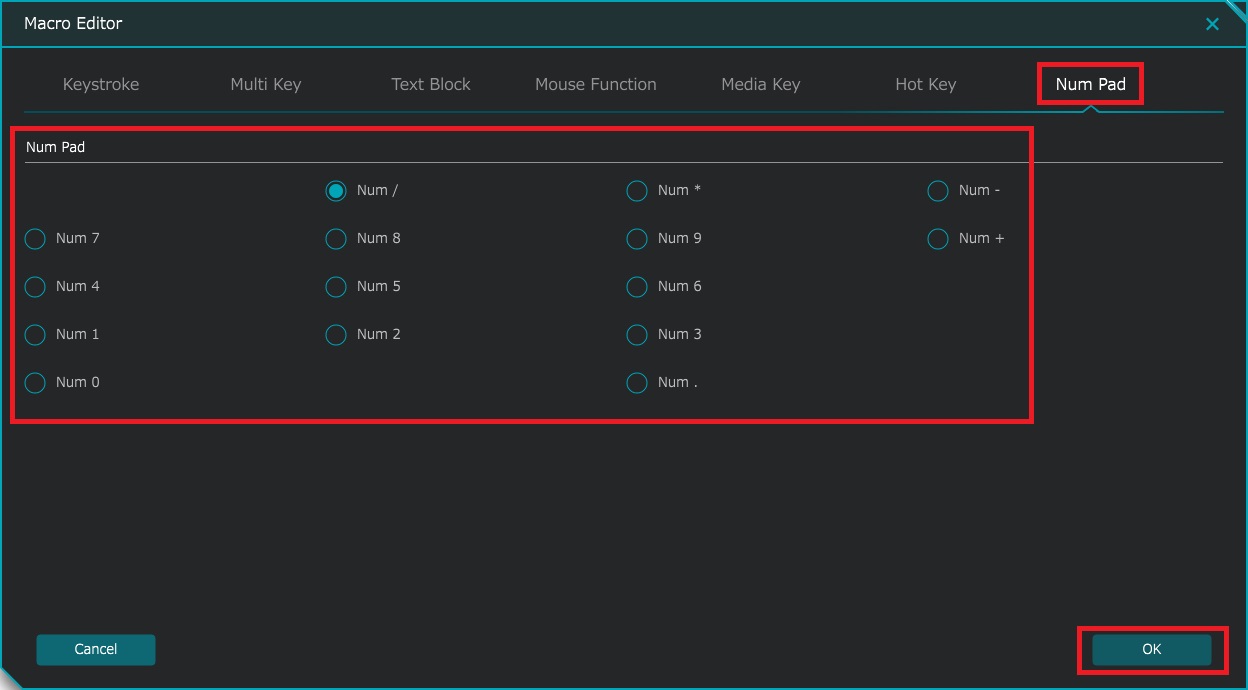
・Num Pad registration
Code of numeric keypad can be set macros with one click.
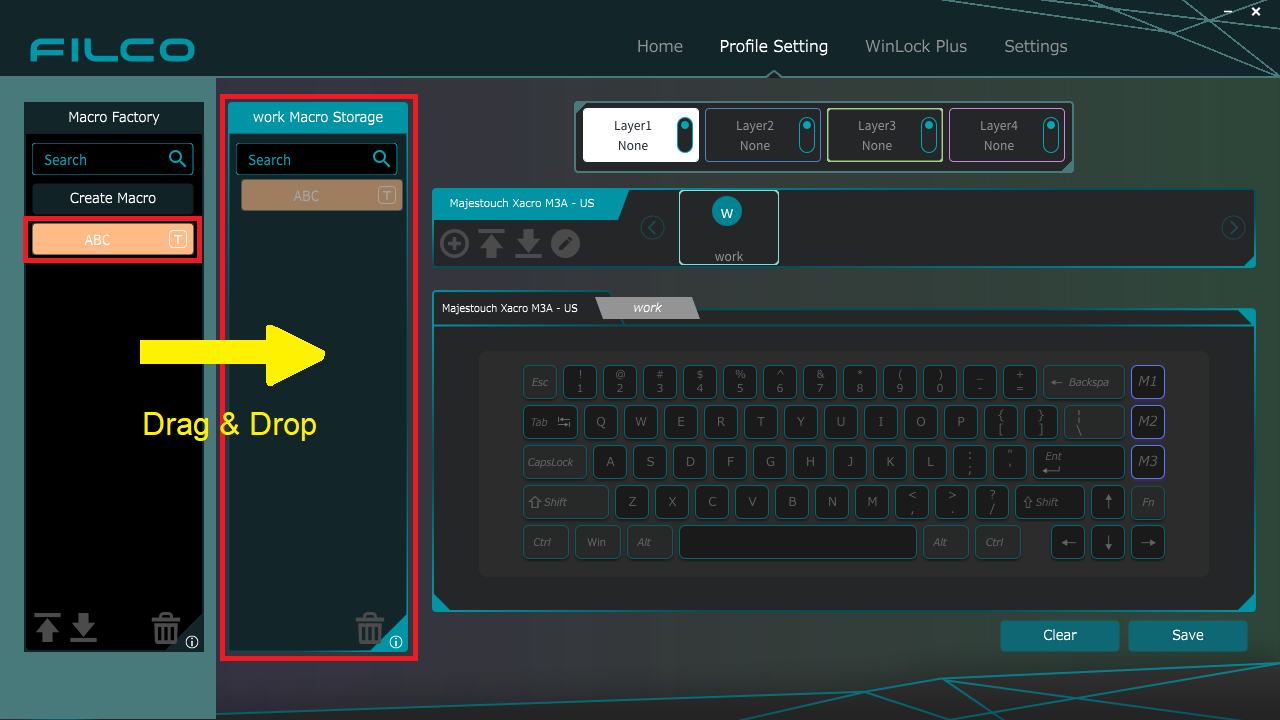
2-4.Register macros in profile
1.Move the macros created in Macro Factory to the macro storage area of each profile.
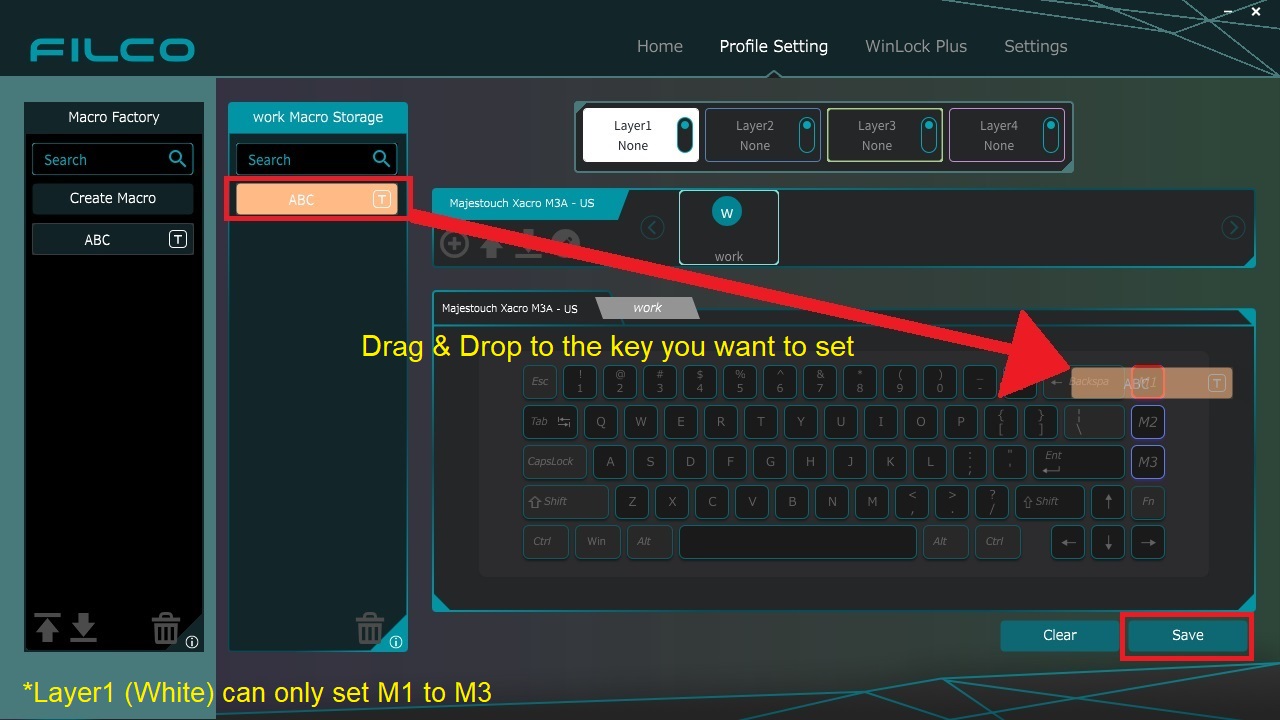
2.Drag and drop the macro you want to set to any key on the profile and save.
2-5.Set the created profile as a layer
You can assign the created profile to the keyboard layer to make the commands work for the first time.
・Drag and drop to the layer where you want to set the profile
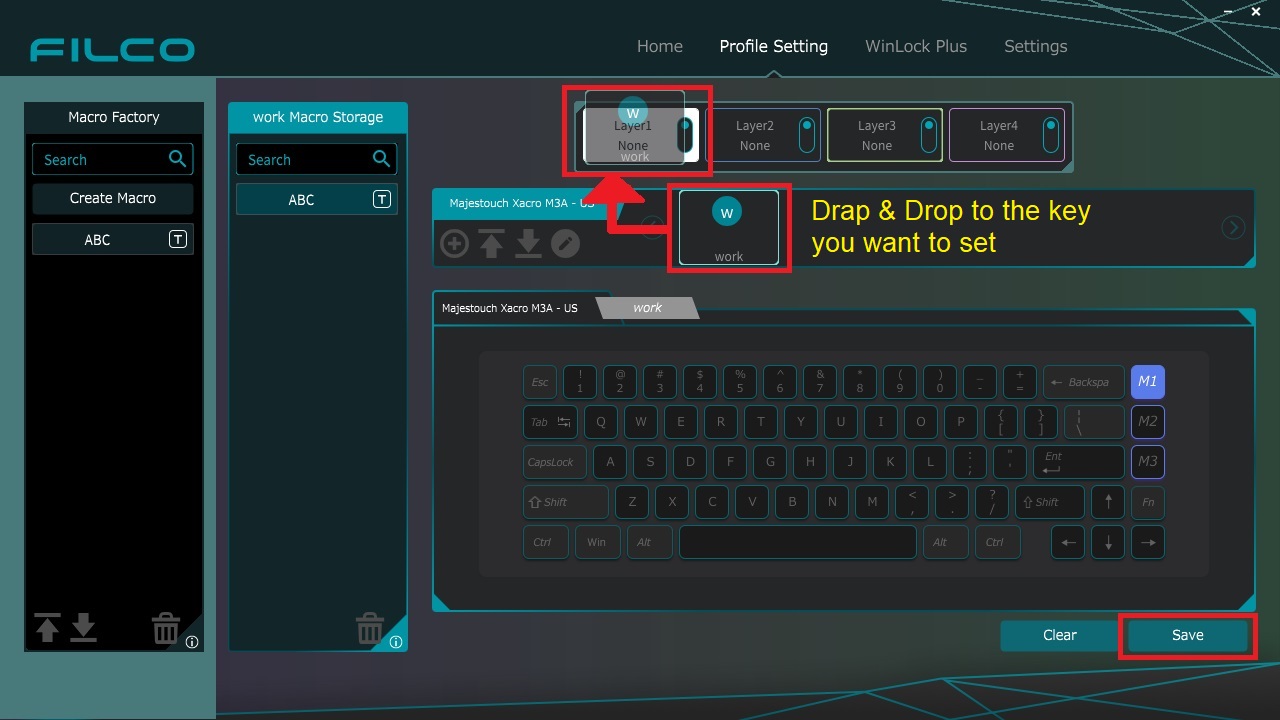
・Set a profile for the layer in use
Move the mouse cursor to the profile you want to set, left-click and select "Set this profile to the layer currently in use" from the pull-down display.
Completed when the profile name set in the upper layer display is displayed.
2-6.Remove profile from layer
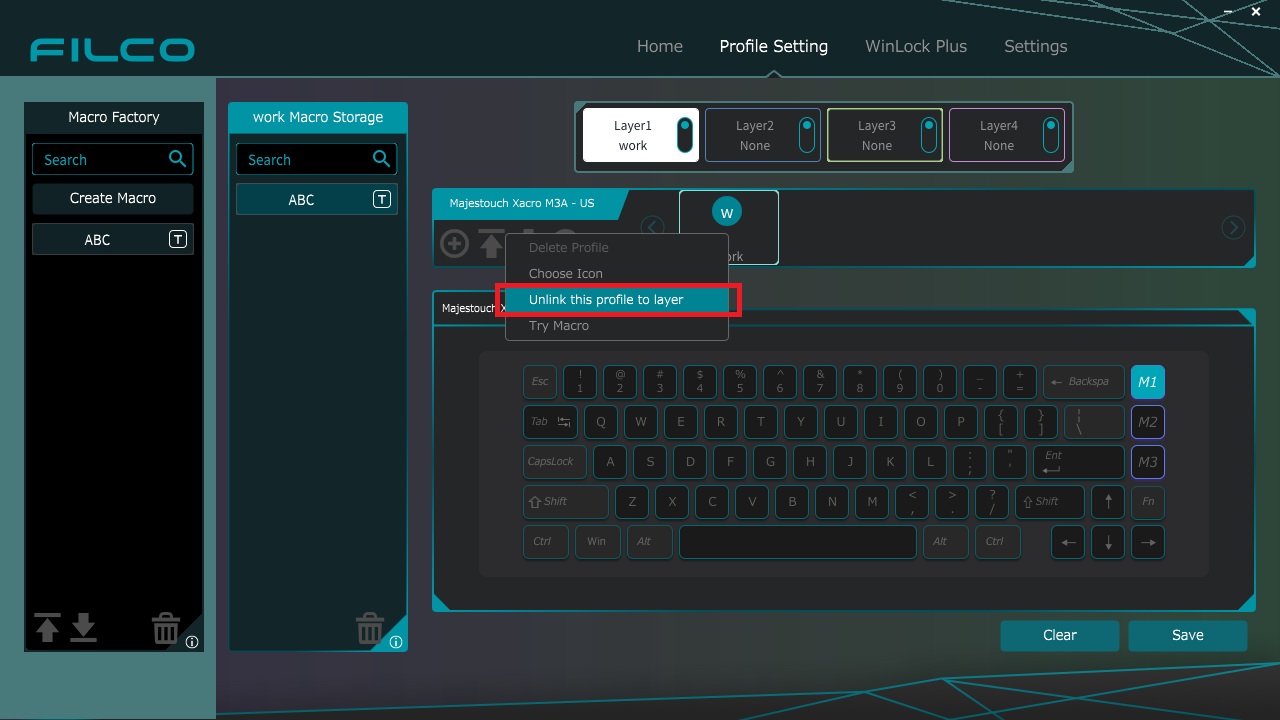
1. Move the mouse cursor to the profile you want to cancel, left-click and select "Unlink this profile to layer" from the pull-down display.
2-7.Other functions
・Profile icon decoration function
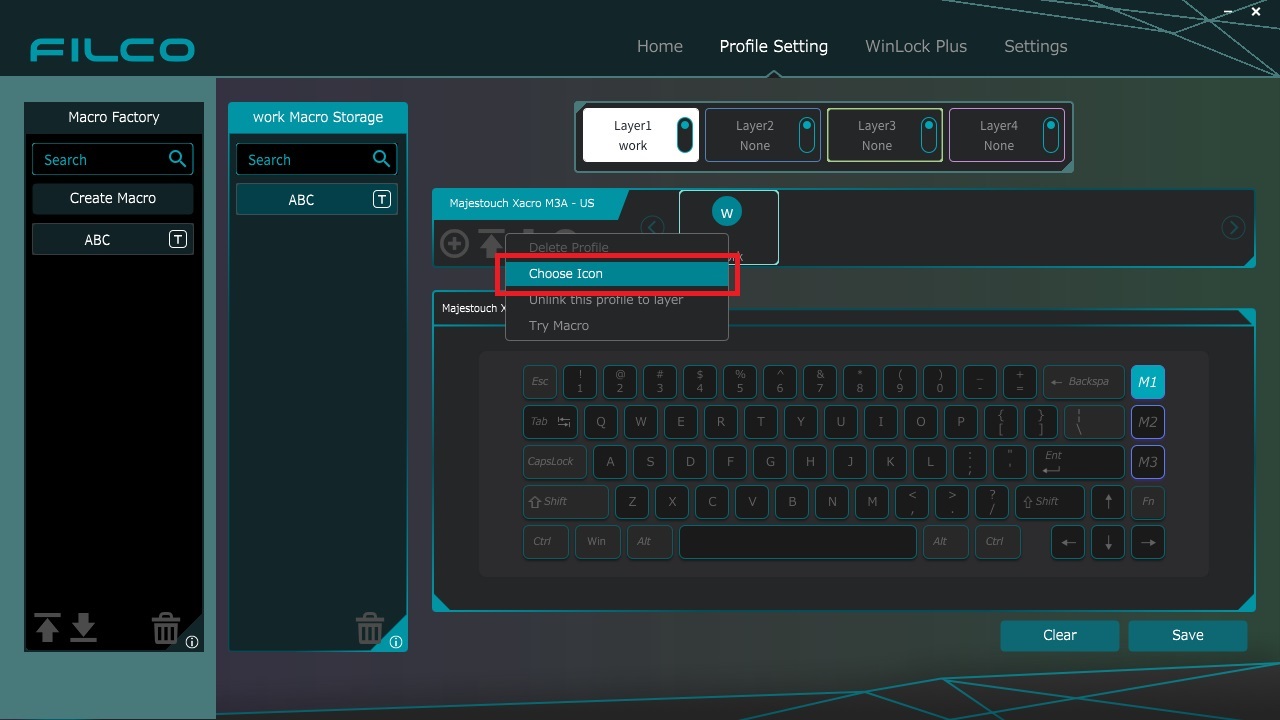
You can paste an icon into your profile. Please prepare a picture or image with a ratio of 5:3 and paste.
* Easily trim to a 5:3 ratio with application software such as "Paint 3D" provided by Microsoft Corporation.
・Export and import functions for macros and profiles
Only 8 profiles can be registered.
If you want to create 8 or more profiles, you can save them in your PC by saving the profile.
Then delete the saved profile from FILCO Assist and create a new profile again.
Also, if you need a profile saved on your PC, register again in FILCO Assist by selecting the folder saved with "Load profile".
3.WinLock Plus
WinLock Plus works with [Fn] + [Alt] + [Left Shift].
Press [Fn], [Alt], [Left Shift] in order. To cancel the WinLock Plus function, press [Fn], [Alt], [Left Shift] in order.
When locking the Windows key, the function of the specified key other than the Windows key can be also disabled at the same time by setting with FILCO Assist.
Keys you want lock can be added other than Windows key when using with games, etc.
1.Click "WinLock Plus" to enter WinLock edit mode.
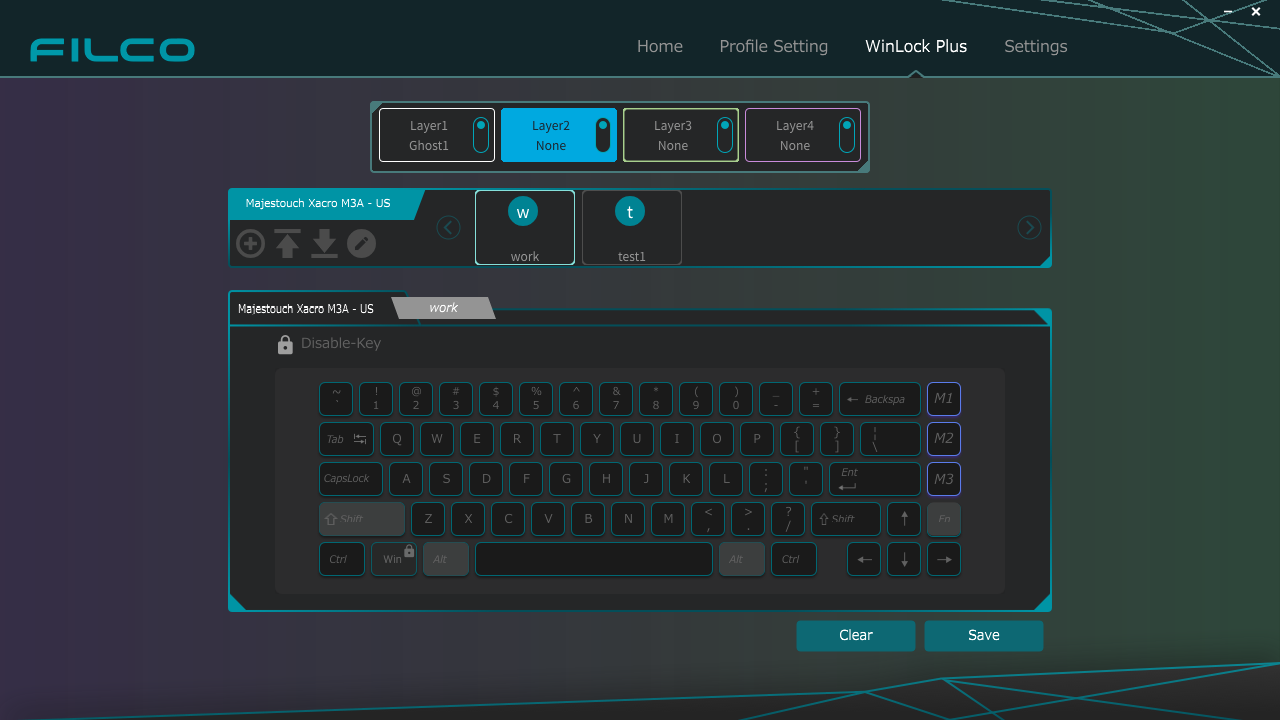
2.Click the key you want to disable.
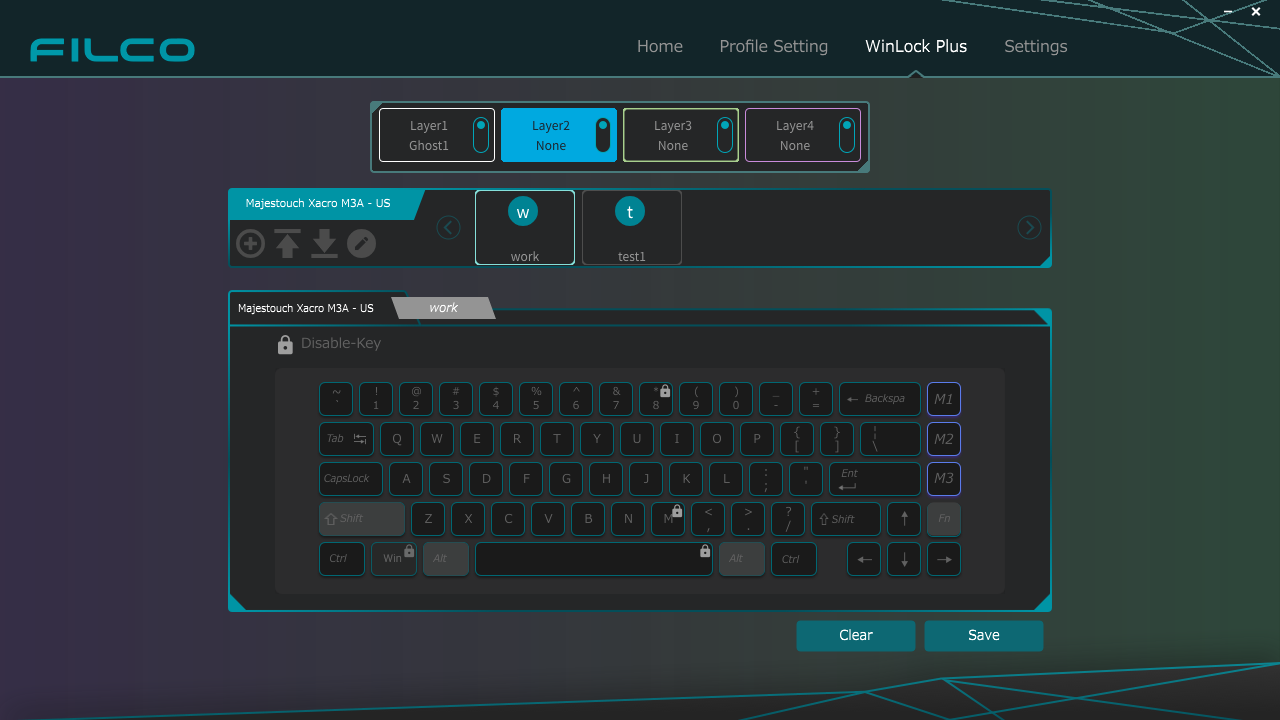
Disabled key displays a Lock icon.

3.After completing the settings, press "Save" button.
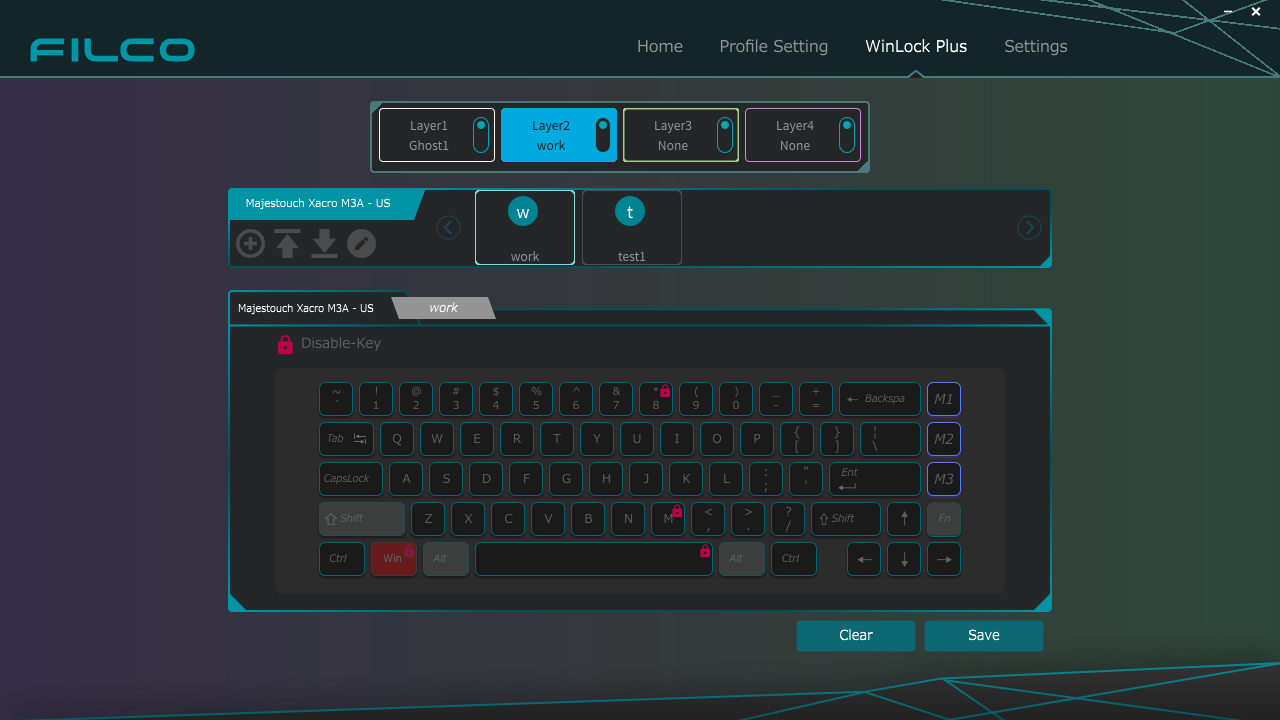
* [Fn], [Alt] and [Left Shift] keys cannot be disabled.
* If the DIP switch is operated while the key position is changed by the DIP switch is locked, the position will be changed while the function remains locked.
Appendix 1. How to register and set downloaded macros
1.Select the profile you want to register and click the "↓" mark at the bottom of Macro Factory.
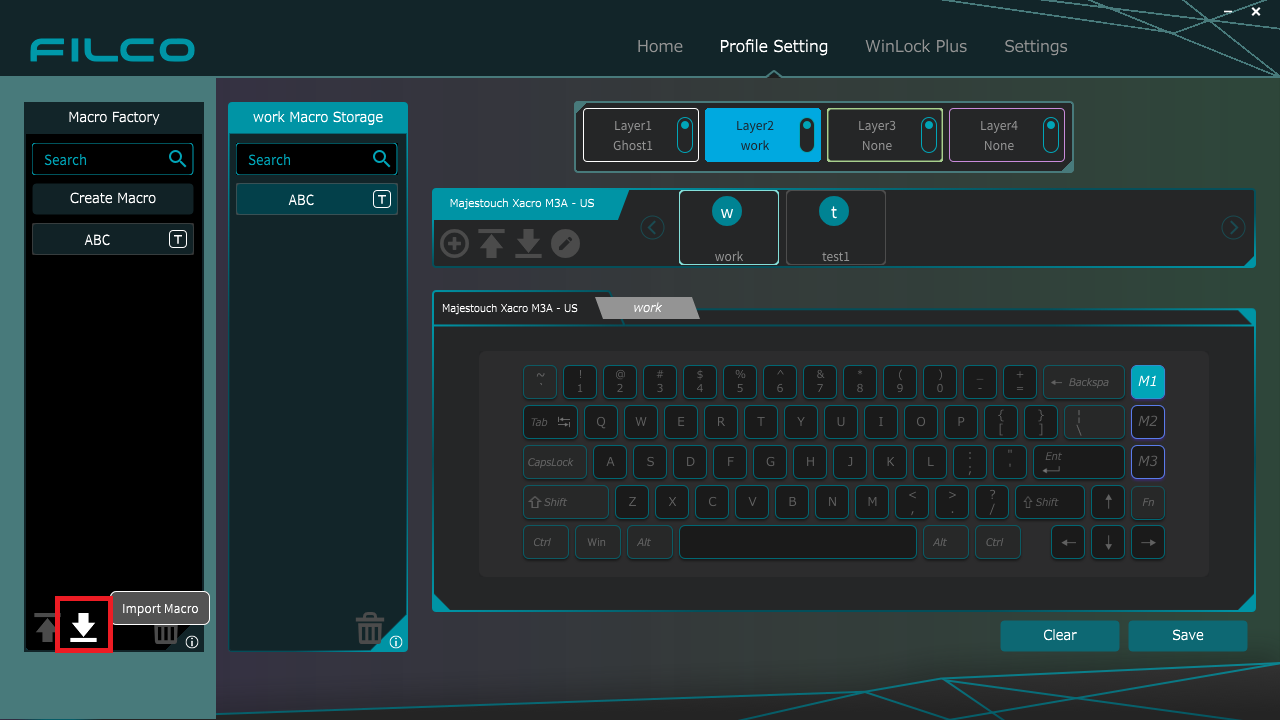
2.Explorer opens, select the macro to load and click Open.
3.Loaded macro will be registered in Macro Factory.
Appendix 2. Windows key shortcut key list
Support for the next software version upgrade is considered.
| Shortcut Key | Operation in win11 | Operation in win10 | |
|---|---|---|---|
| Windows key | Open or close the Start menu | Open or close the Start menu | |
| Windows Key + A | Open Quick Settings | Open Action Center | DL |
| Windows key + B | Set focus to the first icon in the corner of taskbar | Set focus to the notification area | DL |
| Windows key + C | Open [Chat] from Microsoft Teams | Open Cortana in listening mode | DL |
| Windows key + Shift + C | Open the charms menu | Open the charms menu | DL |
| Windows key + Ctrl + C | Enable color filters | ||
| Windows key + D | Show or hide desktop | Show or hide desktop | DL |
| Windows key + Alt + D | Show or hide date and time on desktop | DL | |
| Windows Key + E | Open Explorer | Open Explorer | DL |
| Windows Key + F | Open Feedback Hub and take a screenshot | Open Feedback Hub and take a screenshot | DL |
| Windows Key + G | Open Xbox Game Bar while game is running | Open Game Bar while game is running | DL |
| Windows Key + Alt + B | Toggle HDR ON and OFF | ||
| Windows key + H | Launches voice input | Launch Voice Typing | |
| Windows Key + I | Open Settings | Open Settings | DL |
| Windows Key + J | Sets focus to Windows Tips, if available | Sets focus to Windows Tips, if available | DL |
| Windows key + K | Open Cast from Quick Start | [Connect] Open Quick Action | |
| Windows key + L | Lock PC or switch account | Lock PC or switch account | |
| Windows key + M | Minimize all windows | Minimize all windows | DL |
| Windows key + Shift + M | Restore minimized windows to the desktop | ||
| Windows Key + N | Open Notification Center and Calendar | ||
| Windows key + O | Lock device orientation | Lock device orientation | |
| Windows key + P | Select presentation display mode | Select presentation display mode | DL |
| Windows key + Ctrl + Q | Open Quick Assist | Open Quick Assist | DL |
| Windows key + R | [Run with file name] Open dialog box | [Run with file name] Open dialog box | DL |
| Windows key + Alt + R | (Using Xbox Game Bar) record video of game window with focus | ||
| Windows Key + S | Open Search | Open Search | DL |
| Windows key + Shift + S | Take screenshot of part of the screen | Take screenshot of part of the screen | DL |
| Windows key + T | Cycle through apps on the taskbar | Cycle through apps on the taskbar | DL |
| Windows Key + U | Open Accessibility Settings | Open Easy Access Center on computer | |
| Windows Key + V | Open Clipboard | Open Clipboard | DL |
| Windows key + Shift + V | Set focus to notification | Cycle through notifications | |
| Windows Key + W | Open up the Widgets panel | ||
| Windows key + X | [Quick Link] Open menu | [Quick Link] Open menu | |
| Windows Key + Y | Toggle input between Windows Mixed Reality and Desktop | Toggle input between Windows Mixed Reality and Desktop | |
| Windows Key + Z | Open Snap Layout | View available commands for apps in full screen mode | |
| Windows key + "." or ";" | Open emoji panel | Open emoji panel | |
| Windows key + "," | Temporarily preview Desktop | Temporarily preview Desktop | |
| Windows key + Pause | Open [Settings] > [System] > [About] | Display the System Properties dialog box | |
| Windows key + Ctrl + F | Find PC (if network joined) | Find PC (if network joined) | |
| Windows key + Shift + M | Restores minimized windows to the desktop | ||
| Windows key + number | Open desktop and start the app pinned to the numbered position on the taskbar. Switches to app if already running. | Open desktop and on the taskbar Starts the app pinned at the numbered position. Switches to app if already running. | |
| Windows Key + Shift + number | Open the desktop and start a new instance of the app pinned to the numbered position on the taskbar | Open the desktop and start a new instance of the app pinned to the numbered position on the taskbar | |
| Windows key + Ctrl + number | Open desktop and switch to the last active window of the app pinned to the numbered position on the taskbar | Open desktop and switch to the last active window of the app pinned to the numbered position on the taskbar | |
| Windows key + Alt + number | Open the desktop and open the jump list for the app pinned to the numbered position on the taskbar | Open the desktop and open the jump list for the app pinned to the numbered position on the taskbar | |
| Windows Key + Ctrl + Shift + number | Open the desktop and open a new instance of the app at the specified position on the taskbar as administrator | Open the desktop and open a new instance of the app at the specified position on the taskbar as administrator | |
| Windows Key + Tab | Open Task View | Open Task View | DL |
| Windows key + ↑ | Maximize window | Maximize window | DL |
| Windows key + Shift + ↑ | Snap window with focus to top half of screen | ||
| Windows key + ↓ | Remove current app from screen or minimize desktop window | Remove current app from screen or minimize desktop window | DL |
| Windows key + Shift + ↓ | Snap window with focus to bottom half of screen | ||
| Windows key + ← | Maximize an app or desktop window to the left side of the screen | Maximize an app or desktop window to the left side of the screen | DL |
| Windows key + → | Maximize an app or desktop window to the right side of the screen | Maximize an app or desktop window to the right side of the screen | DL |
| Windows key + Home | Minimize all windows except active desktop window (second keystroke restores all windows) | Minimize all windows except active desktop window (second keystroke restores all windows) | DL |
| Windows key + Shift + ↑ | Extend desktop window vertically on screen | Extend desktop window vertically on screen | |
| Windows key + Shift + ↓ | Restore or minimize the active desktop window vertically while preserving width | Restore or minimize the active desktop window vertically while preserving width | |
| Windows key + Shift + ← or → | Move an app or window on the desktop to another monitor display | Move an app or window on the desktop to another monitor display | |
| Windows key + Shift + Spacebar | Reverse language and keyboard layout | ||
| Windows key + Spacebar | Toggle input language and keyboard layout | Toggle input language and keyboard layout | |
| Windows key + Ctrl + Spacebar | hange to previously selected input value | hange to previously selected input value | |
| Windows Key + Ctrl + Enter | Turn Narrator ON | Turn Narrator ON | |
| Windows key + "+" | Open Magnifier and zoom in | Open Magnifier | |
| Windows key + "-" | Zoom out with magnifier | ||
| Windows Key + Esc | Close Magnifier | ||
| Windows key + "/" | Start IME reconversion | Start IME reconversion | DL |
| Windows Key + Ctrl + V | Open Shoulder Tap | ||
| Windows key + Ctrl + Shift + B | Wake up from a blank or black screen on PC | Wake up from a blank or black screen on PC | |
| Windows Key + Prt Scr | Save full screen screenshot to file | ||
| Windows key + Alt + Prt Scr | (Using Xbox Game Bar) save a screenshot of the focused game window to a file |


